How to Install a Truck Tool Box

Last updated September 7, 2023
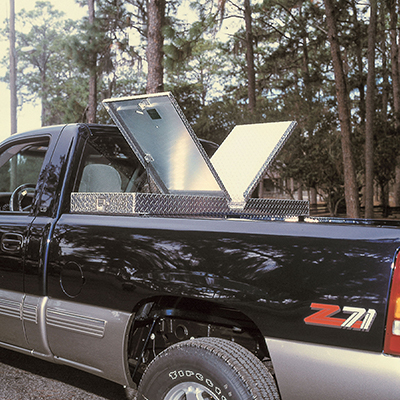
Rugged, all-weather truck tool boxes are a great way to haul all your tools. They protect whatever’s inside from the weather, and their heavy-duty locks help prevent tool theft. At the same time, they keep everything neatly organized so that you can find the right tool fast. Most tool boxes go just below the back window, and you can usually get them in place yourself. This guide will teach you how to install a truck tool box.
Read on to learn how to install a truck tool box.
Difficulty:
Intermediate
Duration:
Under 2 hours
Table of Contents
Get the Right Truck Tool Box
Add Padding
Drill As Needed
Line Up the Toolbox
Drop in a J-Hook
Secure the Hook
Get the Right Truck Tool Box

Before shopping for a truck tool box, take careful measurements of your truck bed and consider the make and model of your truck. Choose a toolbox designed to fit the design of your truck.
Once you have the tool box, place it in the back to ensure it fits properly before continuing with installation. With the tool box lowered into place, open the lid and make sure that nothing is blocking the hinges of the box.
As you shop, consider the overall look of your truck. The paint color, bed lining, and trim will all play a factor in which finish makes the best choice for your vehicle. Take note of the internal cargo room as well as any dividers or organizational features the box contains. Consider the size and types of items you plan to haul when deciding which box is right for you.
Tip: Make sure the tool box sits below the window. Otherwise, it could block your view when you drive.
Add Padding

A metal tool box can scratch a metal truck bed and make noise as you drive over uneven ground. To protect the truck bed and the toolbox and keep things quiet, pad the truck. A layer of rubber padding will cut down on friction and cushion your vehicle.
The material is available by the roll. You can cut it to size with a pair of sharp utility shears. Measure the tool box carefully. Cut the padding to size to fit every spot on the box that will touch the truck.
If your truck bed already has a full liner, you shouldn't need to add padding. A liner will usually provide enough protection on its own.
Drill As Needed

Manufacturers often include the mounting hardware with truck tool boxes. Check to see what comes with yours.
If the tool box comes with nuts and bolts, check the back of your truck. Some trucks have pre-drilled holes for tool boxes. If your truck has this feature, skip down to the next step. Otherwise, you'll need to drill holes in the truck before installing a tool box.
Place the tool box on the truck bed atop the padding. Line up the tool box with the truck. Then, use a power drill to make a hole in the truck under each mounting hole on the box.
To install a tool box with nuts and bolts on a truck with pre-drilled holes, remove the rubber plugs from the bed. Once the holes are open or drilled, feed a bolt through the tool box and the truck. Reach underneath the lip on the truck and screw on the nut.
If the tool box comes with J-hooks, you won’t need to drill into your truck. A J-hook is a metal hook shaped like the letter “J.” It usually has a large washer and a nut on it.
Because J-hooks make installing a truck tool box much easier, you may want to buy J-hooks separately and use them instead of nuts and bolts. The rest of this guide will focus on how to install a tool box with J-hooks.
Safety Tip: Wear protective eyewear and hearing protection when drilling.
Line Up the Toolbox

To install a toolbox with J-hooks, line up the tool box and the lip of the truck bed. Ensure that the box is straight and in the right position on both sides.
While you can remove the hardware and re-position the tool box, taking the time to align things will make this job easier.
Drop in a J-Hook

Slip the J-hook through the washer. Then, drop the hook end through the hole in the tool box.
Secure the Hook

Shift the hook toward the side of the truck. You will feel it brush against the lip on the truck bed. When you sense this, tilt the hook and slide it under the lip. Then straighten it up and pull to catch it on the edge of the lip.
Next, you will add hardware to keep the J-hook from wobbling and sliding out of place. Start by slipping the washer down the J-hook. The washer will likely fit snugly and may resist sliding.
Apply gentle pressure with your fingers to keep it moving. Continue to push the washer all the way down the J-hook until it touches the tool box.
Once the washer is secure, add the nut. Twist to move it down the J-hook until it touches the washer. Tighten as much as you can with your fingers.
To ensure secure installation, finish with a wrench . Grip the nut and move it one-quarter turn clockwise. Repeat this process with the remaining J-screws. For most truck tool boxes, you’ll need four to six J-hooks.
Check the Lid

Once all the J-hooks are in place, slowly lift the lid on the tool box. Check that it doesn’t bump the truck and that the hinges move easily.
If you have any problems, remove the nuts and washers, adjust the truck tool box and reinstall.
Care for Your Tool Box

Properly caring for your truck tool box will help it stand the test of time.
The manufacturer may provide specific care instructions for your truck toolbox. Follow those directions for best results.
The general steps for cleaning a truck tool box are:
- Fill a cleaning bucket with warm water and mild dish soap.
- Dip a soft bristled scrub brush
into the water. - Gently scrub all surfaces of the tool box.
- Use a clean moist rag to wipe off the soapy water.
- Dry with a soft microfiber towel..
Knowing how to install a truck tool box makes it possible to get your storage system in place quickly. Use J-hooks to avoid drilling and simplify the job.
Find the right truck tool box and the hardware, tools and materials you need to get it in place at The Home Depot. Use The Home Depot Mobile App to locate products and check inventory. We’ll take you to the exact aisle and bay.