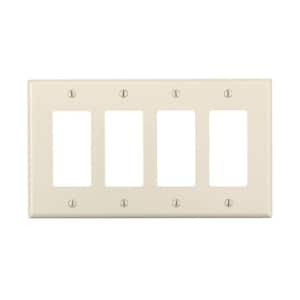
Customer Reviews for Leviton Decora 4-Gang Midway Nylon Wall Plate, Light Almond
Internet #202059801
Model #R56-PJ264-00T
Store SKU #654604
- Easy - includes matching screws for easy installation
- Sleek - contemporary design made from durable thermoplastic nylon
- Convenient - midway size helps cover wall imperfections
Customer Reviews
- 4.8out of 2,480 reviews
- 94% recommend this product
5 2089
2089
4 251
251
3 71
71
2 28
28
1 41
41
Filter by:
Showing 1-30 of 2,480 reviews
Jan 29, 2018
A fairly standard switch plate the Decora 4-Gang Midway Nylon Wall Plate, White works well to cov...
A fairly standard switch plate the Decora 4-Gang Midway Nylon Wall Plate, White works well to cover a 4 up box with switches. It is of decent quality though I do wonder how it will hold up over time. The screws have a tiny bit of wiggle room which is appreciated. It is very flexible but I wished the center portions of the outlet cover where thicker. This is why I gave it one less star. Overall its a fairly standard outlet type of cover.
by
Jan 25, 2018
Excelent quality, good look.
Excelent quality, good look.
by
- Verified Purchase
- Recommended
Jan 24, 2018
Awesome unbreakable cover. This is pretty well made compared to others on the market and other r...
Awesome unbreakable cover. This is pretty well made compared to others on the market and other retailers. I appreciate my color being available as my store has phased out the common Ivory for more trendy goofy blacks, metals, and pastels. I am traditional and like the basics and this does the trick. Be wise when you screw it down and do not over torque it as someone else mentioned it breaks....they were not thinking or careful....you will be fine. When it gets harder to screw down, stop when you feel it.
by
Oct 18, 2017
I got this to use for a new project a combination temperature and humidity control. The Decora 2-...
I got this to use for a new project a combination temperature and humidity control.
The Decora 2-Gang Midway Nylon Wall Plate, Black is versatile and easy to work with what you can do with it is really only limited by your own imagination.
I was able to cut and shape it easily with tin snips and a utility knife.
This is being done as a special super review .
the pictures below are of this featured product.
The finished product is a combination temperature and humidity controller. it can be used for a egg incubator, exotic pet snake tank, water dragon tank, and cigar humidor, etc.
The list of parts for this project are :
a leviton 15 amp duplex outlet
a leviton single gang duplex outlet cover
a Carlon 1-Gang 18 cu. in. PVC Old Work Box
a leviton 2 gang decora black switch plate
a Carlon 2 gang 32 cu new work box
a HDX 15 amp 120 volt 3 prong grounded 6 foot appliance cord
Southwire (By-the-Foot)16-2 Stranded White Lamp Wire and
Southwire (By-the-Foot)16-2 Black Standed Lamp Wire
a wire nut for said wire
4 Everbilt #6 x 3/4 in. Zinc-Plated Pan-Head Phillips Drive Sheet Metal Screws
a temperature control
a humidity control
Rust-Oleum Professional 15 oz. Safety Red Inverted Marking Spray Paint and Rust-Oleum Professional 15 oz. Gloss Royal Blue Spray Paint
Easy MaskKleenEdge 0.94 in. x 54-2/3 yds. Low Tack Painting Tape,
news paper.
vinyl letters
2 sets of Everbilt #8-32 tpi Zinc-Plated Machine Screw Nut with Everbilt #8-32 in. x 1 in. Truss Head Combo Zinc Machine Screw
The wire nut and wire strippers came from the GARDNER BENDER304-Piece Electrical Project Kit, Includes Tools, Tester, Wire Nuts, Cable Ties, Staples and Tape in Reusable Canister
tools : Sharpie Professional Black Marker,
Ryobi Reconditioned 12-Volt Cordless Ni-Cad Drill Kits ,
Ryobi Details Drill and Drive Kit (90-Piece)
Husky Folding Lock Back Utility Knife,
flat and Phillips screw driver, I use the Husky Variety Screwdriver Set (6-Piece)
wire strippers,
straight edge or Empire True Blue 9 in. Professional Torpedo Level
ruler or STANLEY 12 ft. Tape Measure
HDX 6 in. Long Nose Pliers,
Husky Precision Screwdriver Set (7-Piece),
Dawson Compact Digital Multimeter with Audible Continuity
Capri Tools 7 in. Compact Aviation Tin Snips Set (3-Piece)
step 1 : remove the mounting screws from the outlet
2] put the outlet into the the holes for the switch plate and the outlet cover, use a black magic marker to mark the mounting holes
3] drill out all of the holes so the screws will fit snugly.
4] take the outlet cover and cover 1/2 with the news paper using the painters tape and paint it red and put it aside.
5] take the back wire cover off the temp control, hold it up to the decora switch plate for each hole and use the marker to mark off the excess plastic on the left and right sides.
this should be done on the back side, the wire covers are dis-guarded.
6] using the knife cut away the excess plastic so the temp control will fit into both holes snugly with out moving up or down.
7] take both box's, where they will connect together and mark a center line, the 2 gang box needs to have the mounting ears facing down.
8] measure 1 inch from the back of the 2 gang box and make a x on the center line, now measure 2 inchs up put a - and then out from each side of that - and make a x in each spot.
9] do the same to the 1 gang box
10] drill out the outer x holes so the nut and bolt combos will fit the outer holes
11] drill out the center x hole to 1/2 , 5/8 or 3/4 inch
12] on the back of the 2 gang box their is a knock out opposite the wings
13] above the knock out drill 2 holes so a sheet rock screw can fit in them but not the head.
14] pop the knock out, out, and use the knife to cut from the knock out up to the outer edges of the holes so you have a hanging hole with a slot that will hang on a dry wall screw.
15] on the inside of the 2 gang box their are wings on each side of the wire holders that need to be removed.
as they stick out past the screw mounting posts
they can be cut out with the knife, i did that the first few dozen times.
then I started drilling the out side wing area and rip them out with needle nose pliers from the inside.
this is all so the temp and humidity controls will fit.
16] the decora face plate can be placed on the front of the 2 gang box, use the screws to make sure the mounting holes line up correctly, make a line on the back of the face plate where it meets the edge of the 2 gang box on the bottom where it will connect to the 1 gang box.
17] now the top and bottom box's can be bolted together.
18] using the tin snips cut the plastic line across the bottom of the decora face plate. put it aside.
19] the power wire comes in the bottom of the 1 gang box through a wire holder and the ground from it can be screwed onto the earth ground of the outlet and so can the neutral wire.
20] the hot wire gets connected to 4x 14 or 16 gauge wires with the wire nut and they get run through the hole from the 1 gang box into the bottom of the 2 gang box
21] those 4 wires left to right connect to pin 1 solenoid supply and pin 3 power supply on both controllers, you can connect them later.
the pin numbers are facing the back of the controllers
22] 2 ground wires are connected to the second screw of the neutral on the outlet and are run to pin 4 return on both controllers, for now they can be run through the hole box 1 to box 2 they are connected later.
23] break the tab connecting the 2 screws together on the outlet for the small spade hot wire
24] connect 2 wires 1 to each screw these are your feed wires they will connect to pin 2 on each unit, they can be run through the hole.
25]pry open the wire holders with a screw driver and put the humidity sensor wire in the top section and the temp sensor wire in the lower section, both in the lower wire holders of the left side facing the front of the unit.
26] take the tape off the one side of the outlet cover , reverse it and paint the other side blue.
27] take the decora face plate and with the cut side facing down put the temp control in the lower spot so the cut edge is below it.
28] using the wire strippers strip 1/4 inch off the ends of all of the wires after they have been cut to a appropriate length, remembering the extra wire goes into the bottom on the 1 gang box.
29] using the small screw drivers connect the sensor wire first to the temp control from the temp probe, then connect the rest of the wires as described above. using the multi meters beep for closed circuit function to determine which wire is which if their all the same color, the hot feed wire should go to the left side of the outlet.
30] now put in the humidity control, you can see it blocks the screw blocks on the temp control, which is why it had to be done in the correct order. now connect all of the wires as listed above and match up the sensor wires to the listed colors on the wire diagram on the control box, ignoring the rest of the wiring diagram. hot feed to right side outlet.
31] now for the real fun, carefully push the face plate with the now wired up and mounted controls into the 2 gang box, while gently pulling on the sensor wires so they are not jammed in the box and the same to all of the supply wires pulling the excess into the base of the 1 gang box under the outlet.
32] once the face plate is close enough , put in your screws and gently start tightening it so the face plate depresses into the 2 gang box. once it is behind the front of the single gang box that sits out 1/2 further then the 2 gang box your good.
33] gently squash all of the extra wire down into the single gang box so the outlet will fit in their.
if your wires are too long now is the time to shorten them.
34] you can put your vinyl letters on top of the humidity and temp controls
35] if the outlet cover is dry you can mount it using its 3 screws, dont put on the vinyl letters just yet in case you reversed the feed wires.
plug it in and your all set, if the feed wires are correct for function you can put on your vinyl letters. other wise just reverse the outlet cover.
I developed this entire project off the top of my head, their are no blue prints or diagrams and this is the first time I have ever typed out a entire procedure of how I build them.
This is how to build the combination single zone temperature with humidity control.
I also build multi zone temp controls some with over temp alarms.
EVERY THING beyond the temperature and humidity controls them self's , and vinyl lettering was purchased at Home Depot.
by
- DIY
- Recommended
2 found this review helpful
Oct 3, 2017
The 10-packs can with the screws already inserted into the...
The 10-packs can with the screws already inserted into the holes, which made for a faster installation. I installed 4 10-packs and all were individually wrapped and in excellent condition. I also purchased other Leviton wall plates and liked that this brand came in all of the sizes I needed. I would highly recommend the 10-packs and this brand!
by
- Verified Purchase
May 29, 2017
This wall plate worked well and was exactly what I needed. Just be careful not to overtighten the...
This wall plate worked well and was exactly what I needed. Just be careful not to overtighten the screws or it might break.
by
- DIY
- Recommended
2 found this review helpful
May 23, 2017
Looks great, fits great, great price, no complaints. Bought 2 boxes of 10 to redo the whole hous...
Looks great, fits great, great price, no complaints. Bought 2 boxes of 10 to redo the whole house, although it looks like I will need another box.
I have not tested its unbreakability-didn't see a need to waste one, ha ha.
by
- DIY
- Verified Purchase
- Recommended
May 8, 2017
The house I just purchased was last decorated a few decades ago. Rather than buying an updated h...
The house I just purchased was last decorated a few decades ago. Rather than buying an updated house, my wife decided that she would task me to update the old one. Among the many, many projects my wife had in store for me was a complete replacement of all switches, sockets, and wall-plates. A relatively simple, yet incredibly time consuming task. This, of course, after we completely repainted the entire house.
All of this to say, I got very familiar with the electrical isle at Home Depot. I purchased a few of these to go with the matching Leviton switches (http://www.homedepot.com/p/Leviton-Decora-15-Amp-3-Way-Switch-White-R62-05603-2WS/100078412) I installed in my upstairs master and guest bathrooms.
They were easy to install and they've proven durable. They're easy to clean and have a professional appearance. I'm quite pleased with this product and would both recommend it as well as purchase it again.
by
- Recommended
Mar 15, 2017
The plates are as advertised, unbreakable. The old plates were plastic and you tighten the plate ...
The plates are as advertised, unbreakable. The old plates were plastic and you tighten the plate to tight it would crack or break.
by
- Verified Purchase
- Recommended
Feb 21, 2017
I've installed 5 of the 10 wall plates I purchased so far in the last month. None cracked during...
I've installed 5 of the 10 wall plates I purchased so far in the last month. None cracked during the installation, they covered the wall opening comfortably and look great - they are very clean and functional. They are easy to clean - just wipe them using a cloth or paper towel and a household cleaner - and don't seem to scratch easily. I would purchase these again.
by
- DIY
- Verified Purchase
- Recommended
Feb 8, 2017
works as intended.
works as intended.
by
- Verified Purchase
- Recommended
Nov 11, 2016
looks great, was easy to cut to size. sleek, I like the direct wire look.
looks great, was easy to cut to size.
sleek, I like the direct wire look.
by
- Recommended
1 found this review helpful
May 1, 2016
Great swap out!
These are simple and easy to install. I recently had my room painted, so placing my original covers back on, accidentally screwed one in too tight amd cracked it. Decided to just buy another, didn't know they came in different colors. This brown color went great with the brown shades I was adding to that room. I decided to leave the color of the switch white to give it sort of a color block feel. Also, I'm not an electrician so I didn't want to mess with the electrical parts of it.
by
- DIY
- Recommended
Oct 6, 2015
Clean, new look!
These wall plates did not disappoint. They are easy to install and is very easy to wipe clean. They help transform any freshly painted room with crisp white finishing touches. Just perfect!
by
- DIY
- Verified Purchase
- Recommended
May 2, 2024
by
- Verified Purchase
May 1, 2024
by
- Verified Purchase
May 1, 2024
by
- Verified Purchase
May 1, 2024
by
- Verified Purchase
May 1, 2024
by
- Verified Purchase
Apr 29, 2024
It's a good product . Easy to put on .
by
- Verified Purchase
Apr 25, 2024
by
- Verified Purchase
Apr 25, 2024
Installed and works as intended
by
- Verified Purchase
Apr 24, 2024
by
- Verified Purchase
Apr 24, 2024
Just what I needed works perfectly
by
- Verified Purchase
Apr 24, 2024
by
- Verified Purchase
Apr 24, 2024
by
- Verified Purchase
Apr 24, 2024
by
- Verified Purchase
Apr 24, 2024
Bought these for a recent home renovation. They looked very dated. Client wanted something more clean in appearance. So I replaced these with screwless wall plates. The difference is night and day.
by
- Verified Purchase
Apr 21, 2024
Do Not Fit Leviton Outlets... Really?
I purchased and installed 40 Leviton 15 and 20 amp outlets in my basement. Then I installed these plates and they all blow out in the middle. Look terrible. Surprising that the plates do not fit the same brand outlets. Did I get plates from a bad batch? They were very cheap plates and they look cheap on my outlets. Would not recommend.
by
- Recommended
Apr 18, 2024
by
- Verified Purchase
Showing 1-30 of 2,480 reviews
Compare Similar Items
current item | |||
Number of Gangs | |||
|---|---|---|---|
4-Gang | 4-Gang | 4-Gang | 4-Gang |
Wall Plate Material | |||
Plastic | Plastic | Plastic | Plastic |
Package Quantity | |||
1 | 1 | 1 | 1 |
Shape | |||
Rectangular | Rectangular | Rectangular | Rectangular |


