How to Make an Art Supply Caddy

Last updated September 7, 2023
Presented by Rebecca Propes of Rebecca Propes Design & DIY
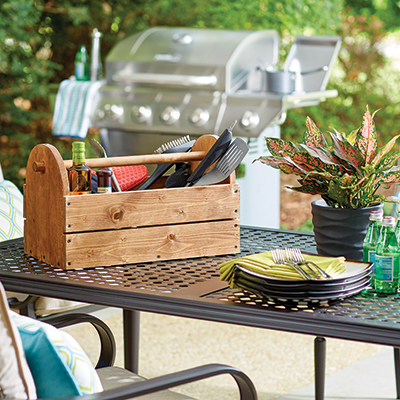
Keep your art supplies organized and at hand with our DIY caddy. Building this caddy ensures clutter remains contained and all your art supplies are right where you need them when working on any project.
Difficulty:
Beginner
Duration:
Under 2 hours
Table of Contents
Make the Cuts
Attach the Pieces
Nail the Pieces
Spray Paint the Hardware
Assemble the Hardware
Apply the Tape
Make the Cuts

Before you begin, make sure you have these tools and materials:
- One 1-inch x 6-inch x 6-foot Common Board
- One 2 1/2-inch x 36-inch Hobby Board
- 1/2-inch Pipe Straps
- Metal Rings
- Spray Paint
- Wood Glue
- Wood Filler
- Painters Tape
- Electrical Tape
- Vinyl Letters
- 1 1 /4-inch brad nails
- #6 1 /2-inch wood screws
- Jute Twine (optional)
- Miter Saw
- Brad Nailer
- Tape Measure
- Pencil
- Safety Goggles
- 220 Grit Sander or Sanding Block
Cut the following with the miter saw:
One 1-inch x 6-inch x 6-foot
primed pine board:
- Two at 4 inches
- One at 12 3/4 inches
One 2.5-inch x 36-inch hobby board:
- Two at 14 1/4 inches
Attach the Pieces

- Using wood glue and brad nails, attach the two 4 x 1 x 6-inch boards to the base of the 12 3/4-inch board.
- Next, attach the two 14 1/4-inch hobby boards, one to each side.
Nail the Pieces

- Attach the 14 1/4-inch hobby boards across each side using wood glue and brad nails.
- Fill nail holes, sand and spray paint as desired.
Spray Paint the Hardware

Using spray paint, paint the hardware, then assemble.
Assemble the Hardware

Attach DIY hardware and corner brackets.
Apply the Tape

Apply colored vinyl electrical tape around the tops of the paint cans and apply vinyl letters to the cans and the crate as desired.
Fill Your Caddy

Fill your caddy with all of the supplies to keep you organized.
Making a DIY art supply caddy is a good way to keep clutter contained. All you need is a little time and the necessary tools. If you're looking for certain items to complete the project, The Home Depot delivers online orders when and where you need them.