How to Prevent a Leaky Hose

Last updated September 7, 2023
Garden hoses take a lot of abuse from being dragged across the ground, left out in the sun and often not being drained before freezing weather. A little TLC can make your hose last longer, so you don’t have to replace it as often.
Preventing leaks and cracks in your hose saves water, so you’ll reduce your water bill and conserve an important natural resource. Read this guide for tips on how to prevent a leaky hose.
Table of Contents
Put Your Hose Away After Use
Inspect the Washer
Fix Pinhole Leaks
Fix Leaks at the Hose End
Drain After Each Use
Roll It Up to Prevent Kinks
Put Your Hose Away After Use

You may be tempted after using your garden hose to just drop it where you stand and leave it on the ground. Exposure to the sun can dry your hose out, leading to cracks. Extreme cold can lead to bursting or splitting. Left on wet ground, it may grow mold or rot. If you drop the hose in tall grass or weeds, you risk running over it next time you mow the lawn. Designate a spot to store your garden hose and put it away after you use it.
Inspect the Washer

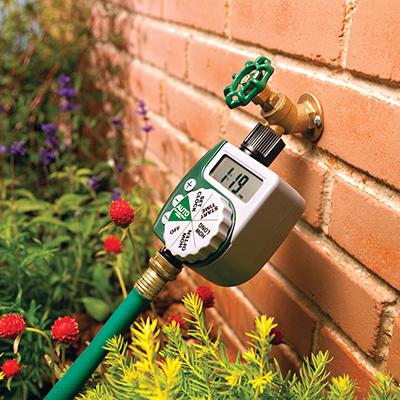
A good washer is one of the most important factors for preventing hose leaks at the spigot. Usually, leaks at the top of the hose are caused by a deteriorating washer. Before using a new hose, locate the washer and make sure it’s properly inserted into the coupling. Inspect the washer when you take your hose out of storage or put it into storage each season. Check the washers on your hose accessories, too.
Tip: Stay on top of washer maintenance by changing them out at the start of the spring season rather than waiting for leaks to develop.
Fix Pinhole Leaks

A pinhole leak doesn't have to spell the end for your hose. It’s fairly easy to fix. First, clean the area around the leak with some soap and water to remove any dirt and grime and allow it to dry. Apply bicycle tube glue or rubber cement over the leak. After the glue or cement dries, wrap the area with plumber's tape and your hose should be good to use for a few more seasons.
Fix Leaks at the Hose End

If you see a leak between the hose and the spigot, your first step should be to check the washer. If the washer is fine and the leak is coming from the hose end itself, there may be a simple fix. First, use shears or a sharp pair of sturdy scissors to cut off the damaged end. Then, pick up a hose repair kit and follow the instructions to attach the new replacement coupler.
Drain After Each Use

Simply shutting off the hose nozzle when you’re done doesn’t mean the garden hose is empty of water. On the contrary, it’s full of water. Pressure may build up in the hose, which can eventually cause it to stretch and leak. When you’re done using the hose, turn the water off at the spigot, and open the hose spray nozzle to allow any excess water inside to drain out. This is especially important in colder weather since the water may freeze and expand overnight and cause the hose to burst.
Tip: An easy way to drain water out of a hose is to coil it over your shoulder.
Roll It Up to Prevent Kinks

Leaving your garden hose in a pile can lead to twisted tangles and kinks. Severe kinking can irreparably damage your hose.
There are many hose storage solutions that make it easy to roll up and store your hose safely. Hose carts, reels and wall-mounted holders come with a crank that you simply turn to wind the hose around it. You can also coil it up inside a hose pot or hang it from an ornamental hose stand.
Store It Out of Direct Sunlight

One of the main reasons why proper garden hose storage is so important is to keep the hose out of direct sunlight. The sun's strong UV rays can cause the outer layers of the hose to deteriorate, leading to cracks and other types of damage. The sun’s heat can also heat any water left inside and damage to the hose’s inner tubing. Always roll up your hose in a coil and store it away in a nicely shaded spot.
Don't Pull Your Hose by the Nozzle

If you pull your hose around by the spray nozzle, as most of us do, it can weaken the spot where the nozzle connects to the hose. Eventually, a weakened connector area can lead to a major and irreparable leak. Rather than dragging it by the nozzle, grab onto the hose several inches below the nozzle, and pull it along with you.
Don't Overtighten at the Spigot

Another easy way to keep your garden hose in good shape and prevent leaks is to not overtighten when you attach it to the spigot, another hose or an accessory. Overtightening can crush and damage the washer, resulting in leaks. You shouldn't need to use a wrench to make everything tight enough — hand tightening provides all the force necessary for a tight seal.
Winterize Your Hose

To properly winterize your garden hose, detach it, drain out the water and store it away in a space that stays above freezing temperatures. While a shed or an unheated garage will keep the hose out of the elements, freezing temperatures can still reduce its flexibility and kink resistance. Storing your hose at room temperature will help it last much longer.
Preventing leaks in your garden hose saves you the cost of replacement and proper maintenance is key to stopping leaks before they happen. With the right habits and a few simple tools, you'll be all set to keep your hose in great shape year after year. Whether you need hose storage, accessories or a repair kit, download
The Home Depot Mobile App to locate and buy everything you’re looking for.