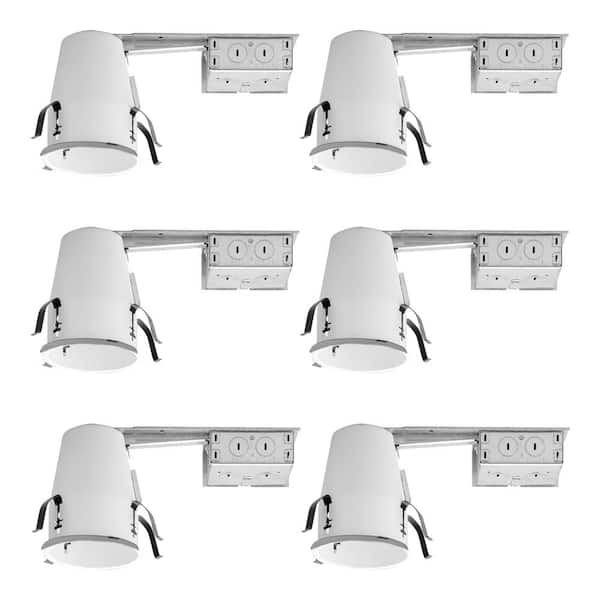
The H99RTAT is a small aperture Non-IC AIR-TITE housing for providing accent and task lighting. The H99RTAT is designed for use in non-insulated existing ceilings. Non-IC Housing is AIR-TITE but insulation must be kept 3 in. away from all sides of housing. Intended for easy installation from below the ceiling.
6 units - buy more and save more on superior quality recessed cans
Has four remodel clips which secure the recessed housing and accommodates 1/2 in. and 5/8 in. ceiling material
Compatible with a wide variety of 4 in. recessed light trims but is best with Halo 999, 998, 993, 992, 990, 953 and 951 series models
Compatible with a wide variety of 4 in. LED retrofit trims but is best with Halo quality RL, RA, SLD, LT, SMD and ML series models (Bulb free with some having a 45 year LED lifespan)
5-1/2 in. housing height allows for use in 2 in. x 6 in. joist construction
3 "Quick Connect" connectors eliminate the need for separate wire nuts - simply strip supply wires and push in
Can be installed from below the ceiling in home remodel applications, ideal for those who have limited or no access to their ceiling
Air-Tite rated design meets restricted air flow code requirements which prevents airflow between attic and living areas and saves on both heating and air conditioning costs
Listed for damp location when used with dedicated wet rated recessed ceiling lights
Uses PAR incandescent bulbs up to 50-Watt (not included)
Features an integral thermal protector to guard against misuse of insulation materials and improper lamping
A: Please note that H99RTAT is compatible with PAR 20, refer to the below link for more details.
https://images.thdstatic.com/catalog/pdfImages/b4/b454e494-8d54-4240-b197-e07c45a942ca.pdf
by|Nov 17, 2023
Q:how to removed ficture h99rt?
by|Jul 20, 2023
1 Answer
Answer This Question
A: Please note the socket in this housing is not attached to the can. It is loose and held in place with the socket bracket.
Refer the below link for more information.
https://images.thdstatic.com/catalog/pdfImages/bb/bb335f97-6ea1-4aa3-be70-f8651f3e1bcb.pdf
https://images.thdstatic.com/catalog/pdfImages/b4/b454e494-8d54-4240-b197-e07c45a942ca.pdf
by|Jul 21, 2023
Q:Can these can be used with Par16 45W halogens? I see info regarding LEDs and incandescent bulbs, but not halogens.
by|Jul 8, 2023
1 Answer
Answer This Question
A: Please note it is compatible with 45W halogen.
by|Jul 8, 2023
Q:is the bulb/socket depth adjustable? The ones I have right now are fixed and shallow, and as such the bulb is no longer fully recessed which causes more glare.
by|May 31, 2023
1 Answer
Answer This Question
A: Please note the rigid socket plate adjusts and locks without tools for various lamp sizes, Socket plate and bracket may be removed when using socket supporting trims. Refer the below link to access the specification sheet of H7RICAT for more details.
https://www.cooperlighting.com/api/assets/v1/file/CLS/content/d9bbb136fbe047a0ad65ad41007a7046/h7ricat_adv042489
by|Jun 1, 2023
Showing 1-4 of 55
Customer Reviews
4 out of 5
(432)
4
out of 432 reviews
71% recommend this product
5
227
4
99
3
31
2
29
1
46
Filter by:
Showing 1-10 of 432 reviews
Apr 28, 2020
easy install great look
It was very easy to install these. Make sure you cut the holes perfect
by
Recommended
Oct 15, 2019
I had my son in law install the lights, he...
I had my son in law install the lights, he happens to be an electrician. But when I saw him instal them I was amazed! They went in so quickly and didn’t have to mounted to a stud. The light and the look is beautiful.
by
Verified Purchase
Jan 8, 2019
The product was great and very easy to work with. Only gave it 4 stars because the clips on the i...
The product was great and very easy to work with. Only gave it 4 stars because the clips on the inside gave me a hard time. Everytime i’d push them in they would pop right out. It extended my project time for sure.
by
Verified Purchase
Recommended
2 found this review helpful
Jan 19, 2018
Great product I have used them before. Perfect for this shower and future maintenance if needed. ...
Great product I have used them before. Perfect for this shower and future maintenance if needed. While installing 3/4 plywood ceiling I cut 6" square holes to leave room for the clips.Then the stone vender used the provided templates to cut 4" round holes threw the 3/4 Quartz. Once the Quartz ceiling was up for a few days it was very simple to reach in and pull down the extra romex wiring I had installed while building the shower. Add the wire supports to the provided knock out holes and the provided electrical quick connects work great.
Once i slide them into the mounting spot the clips held very well. They were finished with Halo wet rated Led trim 4000K. Insulation was not present because this was a basement ceiling and non was installed.Future Maintenance was critical to me because the only option was to have a removable light or cut threw the bedroom floor upstairs. Note the lights are removable if ever needed. My Quartz ceiling is not removable since the ceiling was cut and installed as one piece before the walls below also one piece each were installed.
by
Verified Purchase
Recommended
1 found this review helpful
Oct 24, 2017
Great product for the price.
by
Verified Purchase
Recommended
2 found this review helpful
Dec 6, 2016
I have installed many of theses types of cans in prior years, I decided to customize my car age a...
I have installed many of theses types of cans in prior years, I decided to customize my car age an use recessed lighting (10) these were a little more of a chore because of the foam around the clips and flange, but once the foam around the clips was removed an some bending of the clips all went up. Can't beat the price
by
Verified Purchase
Recommended
2 found this review helpful
Jul 23, 2016
The Definitive Review
When initially researching these housings, I was not able to completely understand the various comments people were posting on the tabs. I did see that people were successful in figuring it out, so I bought the housings and I did figure it out.
These are 6 inch aluminum body remodel housings, the air-tite version and approved for IC. As others have commented, the aluminum is light weight and can be bent. They come six to a box in the store and the tabs are likely to catch on the housing next to them and your odds of picking a random housing with one of the four tabs missing appears to be greater than 50%. Check your housings as you pull them out of the box and make sure you have all four tabs. They are easy to pop back in if they have been pulled free from the housing. Also, check for bent housings...best to start with straight ones and try to keep them that way, although you can bend them back to shape.
Installing the housings...caution, be sure you know what is above the ceiling if you are cutting a hole into the ceiling above you. I had to work around an AC duct, water pipes (one of which took a 90 degree turn in the middle of the room and cut through the joist bay), and other electrical runs. I used a Milwaukee adjustable hole cutter with the drywall dust catch plastic pan on the bottom...worked well. I set the hole diameter for 6 1/4 inches. The resulting hole is tight, but the housing will go through with a wrap from the palm of the hand. I would not go up to 6 1/2 inches. The template that comes with the housing is also 6 1/4 inches in diameter. Before placing the housing into the ceiling, determine if your downlight requires the housing to be adjusted to the full depth. I used a Cree TW Series downlight, 85 watt equivalent (great light with 1100 lumens, CRI of 90+, and dimmable). This downlight would not fit into the housing at the factory depth setting. There is a wingnut inside the housing: loosen it, slide the internal housing piece back to increase the depth capability for the downlight, then tighten the wingnut. See my attached photos. Your downlight may not require this adjustment.
You must connect your wiring before placing the housing up into the ceiling. Using the quick connectors is easy, just strip 1/2" of insulation from the wires and firmly push them into the connectors. Visually inspect through the clear plastic that you seated the wires fully: you do not want to have a light not come on and have to pull the light and housing down out of the ceiling later on.
Once the housing is up into the ceiling, you must lock the four tabs in place. If you have been reading the other reviews, this is the biggest issue with this housing. Several people reported success with bending the tabs...I found you don't need to bend them at all. If your ceiling drywall is 5/8" thick, you are going to need to use a large screwdriver to put the necessary force on these tabs to get them to lock into place. If your ceiling is 1/2" drywall, you may be successful with just using your fingers. There is some gray insulation material on each of the four spring tabs...this spongy gray insulation hides a small sub-tab piece of metal that juts out from the tab which is where you will want to place the blade of a large, standard screwdriver. You can feel this subtab with your fingers. You can pull the spongy material off one if you want to visually see it. With the housing up in the ceiling, I pushed the spring tab up against the side of the house, then placed my standard screwdriver blade tip against the subtab. While keeping pressure against this subtab, I then used the palm of my hand to rap the end of the screwdriver, driving the spring tab upward and back against the housing. Don't rap the screwdriver too hard, you might push the tab all the way through the side of the housing. Once you figure out how much force is needed, the spring tab will lock into place and you will quickly understand that locking the tabs in place is very easy. You will quickly move through the other tabs after this. See the attached photos.
At this point, remove the plastic socket protector tab, if it is still in place. Screw in your downlight connector, then pop your downlight up into the housing. There are several different mechanisms to get the downlights into the housing...consult the instructions that came with our downlight. I tapped/twisted my downlights as needed to get them to remain flush with the ceiling.
by
DIY
Recommended
22 found this review helpful
Sep 24, 2013
Awesome products !
Awesome product. It enabled us to switch from Holegen lighting & an awful hanging track lighting system to efficient LED lighting system also purchased at Home Depot. It's just beautiful now, see attached photos.