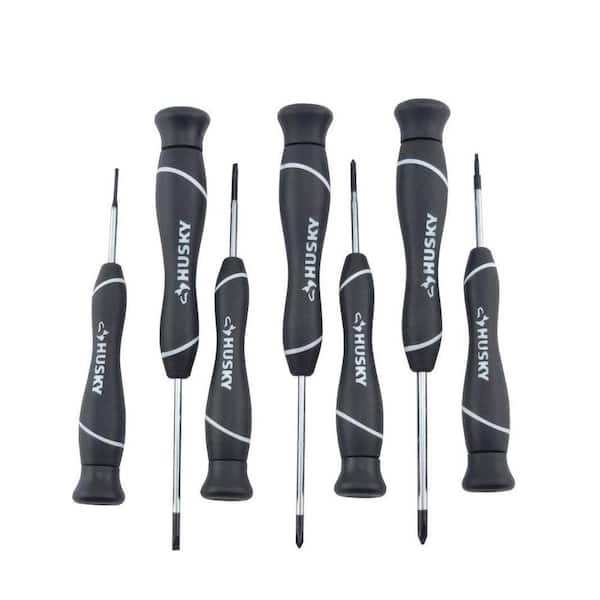
The screwdrivers in this Husky 7-piece set are equipped with contoured handles to provide a comfortable, secure grip. 1 Torx, 3 slotted and 3 Phillips screwdrivers comprise this assorted pack, which is particularly handy for fastening screws on electronics gadgets and trinkets in addition to other tasks involving small objects. The end cap on each handle swivels, allowing the user to hold the tool steady with 1 hand while cranking with the other.
Constructed with durable composite handles for lasting use
Includes 3 slotted screwdrivers: (1) 1 in. blade with a 1/16 in. tip, (1) 1-1/2 in. blade with a 3/32 in. tip and (1) 2-1/2 in. blade with a 1/8 in. tip
Includes 3-Phillips screwdrivers: (1) 1-1/2 in. blade with a #00 tip, (1) 2-1/2 in. blade with a #0 tip and (1) 2-1/2 in. blade with a #1 tip
Also includes a 1-1/2 in. Torx screwdriver with a T6 tip
Tips fit snugly in screws, allowing users to impart maximum torque
Call 1-888-HD-HUSKY for customer service and support.
Backed by a Lifetime Warranty. If your Husky product ever fails, bring it back and we will replace it for free. Click here for details.
Q:Internet #302435926
Model #67123H
Store SKU #1000014267
is this product coming back to stores. Its been out of stock for months
by|May 19, 2022
0 Answer
Answer This Question
Q:Are these made in the USA?
by|Jan 3, 2022
1 Answer
Answer This Question
A:Â Oh, I'd just about guarantee it...
by|Jun 3, 2022
Q:Do you really have to 'hold the tool steady with 1 hand while cranking with the other'?
by|Sep 3, 2021
1 Answer
Answer This Question
A:Â I can do it with only one hand...
by|Nov 6, 2021
Q:How do you replace one broken driver via lifetime warranty?
by|Dec 10, 2020
2 Answers
Answer This Question
A:Â you should be able to send in to husky and let them know what happened - they ask what happened - concerning the driver
i don't even bother as i have had extremely good luck with them - they are a bargain for what they are
by|Jan 1, 2021
A:Â Bring in the screw driver to the store. They will take care of it.
by|Mar 18, 2021
Showing 1-4 of 13
Customer Reviews
4.5 out of 5
(310)
4.5
out of 310 reviews
84% recommend this product
5
209
4
70
3
15
2
5
1
11
Filter by:
Showing 1-10 of 310 reviews
Oct 17, 2017
I got this to use for a new project a combination temperature and humidity control. The Husky Pr...
I got this to use for a new project a combination temperature and humidity control.
The Husky Precision Screwdriver Set (7-Piece) is versatile and easy to work with what you can do with it is really only limited by your own imagination.
This is being done as a special super review .
The finished product is a combination temperature and humidity controller. it can be used for a egg incubator, exotic pet snake tank, water dragon tank, and cigar humidor, etc.
The list of parts for this project are :
a leviton 15 amp duplex outlet
a leviton single gang duplex outlet cover
a Carlon 1-Gang 18 cu. in. PVC Old Work Box
a leviton 2 gang decora black switch plate
a Carlon 2 gang 32 cu new work box
a HDX 15 amp 120 volt 3 prong grounded 6 foot appliance cord
Southwire (By-the-Foot)16-2 Stranded White Lamp Wire and Southwire
(By-the-Foot)16-2 Black Standed Lamp Wire
a wire nut for said wire
4 Everbilt #6 x 3/4 in. Zinc-Plated Pan-Head Phillips Drive Sheet Metal Screws
a temperature control
a humidity control
Rust-Oleum Professional 15 oz. Safety Red Inverted Marking Spray Paint and Rust-Oleum Professional 15 oz. Gloss Royal Blue Spray Paint
Easy MaskKleenEdge 0.94 in. x 54-2/3 yds. Low Tack Painting Tape, news paper.
vinyl letters
2 sets of Everbilt #8-32 tpi Zinc-Plated Machine Screw Nut with Everbilt #8-32 in. x 1 in. Truss Head Combo Zinc Machine Screw
The wire nut and wire strippers came from the GARDNER BENDER304-Piece Electrical Project Kit, Includes Tools, Tester, Wire Nuts, Cable Ties, Staples and Tape in Reusable Canister
tools : Sharpie Professional Black Marker, drill, Husky Folding Lock Back Utility Knife, flat and Phillips screw driver, wire strippers, straight edge or ruler, needle nose pliers, Husky Precision Screwdriver Set (7-Piece), multi meter
step 1 : remove the mounting screws from the outlet
2] put the outlet into the the holes for the switch plate and the outlet cover, use a black magic marker to mark the mounting holes
3] drill out all of the holes so the screws will fit snugly.
4] take the outlet cover and cover 1/2 with the news paper using the painters tape and paint it red and put it aside.
5] take the back wire cover off the temp control, hold it up to the decora switch plate for each hole and use the marker to mark off the excess plastic on the left and right sides.
this should be done on the back side, the wire covers are dis-guarded.
6] using the knife cut away the excess plastic so the temp control will fit into both holes snugly with out moving up or down.
7] take both box's, where they will connect together and mark a center line, the 2 gang box needs to have the mounting ears facing down.
8] measure 1 inch from the back of the 2 gang box and make a x on the center line, now measure 2 inchs up put a - and then out from each side of that - and make a x in each spot.
9] do the same to the 1 gang box
10] drill out the outer x holes so the nut and bolt combos will fit the outer holes
11] drill out the center x hole to 1/2 , 5/8 or 3/4 inch
12] on the back of the 2 gang box their is a knock out opposite the wings
13] above the knock out drill 2 holes so a sheet rock screw can fit in them but not the head.
14] pop the knock out, out, and use the knife to cut from the knock out up to the outer edges of the holes so you have a hanging hole with a slot that will hang on a dry wall screw.
15] on the inside of the 2 gang box their are wings on each side of the wire holders that need to be removed.
as they stick out past the screw mounting posts
they can be cut out with the knife, i did that the first few dozen times.
then I started drilling the out side wing area and rip them out with needle nose pliers from the inside.
this is all so the temp and humidity controls will fit.
16] the decora face plate can be placed on the front of the 2 gang box, use the screws to make sure the mounting holes line up correctly, make a line on the back of the face plate where it meets the edge of the 2 gang box on the bottom where it will connect to the 1 gang box.
17] now the top and bottom box's can be bolted together.
18] using the sheet metal sheers cut the plastic line across the bottom of the decora face plate. put it aside.
19] the power wire comes in the bottom of the 1 gang box through a wire holder and the ground from it can be screwed onto the earth ground of the outlet and so can the neutral wire.
20] the hot wire gets connected to 4x 14 or 16 gauge wires with the wire nut and they get run through the hole from the 1 gang box into the bottom of the 2 gang box
21] those 4 wires left to right connect to pin 1 solenoid supply and pin 3 power supply on both controllers, you can connect them later.
the pin numbers are facing the back of the controllers
22] 2 ground wires are connected to the second screw of the neutral on the outlet and are run to pin 4 return on both controllers, for now they can be run through the hole box 1 to box 2 they are connected later.
23] break the tab connecting the 2 screws together on the outlet for the small spade hot wire
24] connect 2 wires 1 to each screw these are your feed wires they will connect to pin 2 on each unit, they can be run through the hole.
25]pry open the wire holders with a screw driver and put the humidity sensor wire in the top section and the temp sensor wire in the lower section, both in the lower wire holders of the left side facing the front of the unit.
26] take the tape off the one side of the outlet cover , reverse it and paint the other side blue.
27] take the decora face plate and with the cut side facing down put the temp control in the lower spot so the cut edge is below it.
28] using the wire strippers strip 1/4 inch off the ends of all of the wires after they have been cut to a appropriate length, remembering the extra wire goes into the bottom on the 1 gang box.
29] using the small screw drivers connect the sensor wire first to the temp control from the temp probe, then connect the rest of the wires as described above. using the multi meters beep for closed circuit function to determine which wire is which if their all the same color, the hot feed wire should go to the left side of the outlet.
30] now put in the humidity control, you can see it blocks the screw blocks on the temp control, which is why it had to be done in the correct order. now connect all of the wires as listed above and match up the sensor wires to the listed colors on the wire diagram on the control box, ignoring the rest of the wiring diagram. hot feed to right side outlet.
31] now for the real fun, carefully push the face plate with the now wired up and mounted controls into the 2 gang box, while gently pulling on the sensor wires so they are not jammed in the box and the same to all of the supply wires pulling the excess into the base of the 1 gang box under the outlet.
32] once the face plate is close enough , put in your screws and gently start tightening it so the face plate depresses into the 2 gang box. once it is behind the front of the single gang box that sits out 1/2 further then the 2 gang box your good.
33] gently squash all of the extra wire down into the single gang box so the outlet will fit in their.
if your wires are too long now is the time to shorten them.
34] you can put your vinyl letters on top of the humidity and temp controls
35] if the outlet cover is dry you can mount it using its 3 screws, dont put on the vinyl letters just yet in case you reversed the feed wires.
plug it in and your all set, if the feed wires are correct for function you can put on your vinyl letters. other wise just reverse the outlet cover.
I developed this entire project off the top of my head, their are no blue prints or diagrams and this is the first time I have ever typed out a entire procedure of how I build them.
This is how to build the combination single zone temperature with humidity control.
I also build multi zone temp controls some with over temp alarms.
EVERY THING beyond the temperature and humidity controls them self's was purchased at Home Depot.
by
DIY
Recommended
Sep 20, 2017
Very good tool for electronic devices
by
Verified Purchase
Recommended
Oct 25, 2023
by
Oct 18, 2023
This met my expectations
by
Oct 13, 2023
by
Oct 4, 2023
I like these better than the all in one sets that include one handle and many blades. So I bought both.
Milwaukee Precision Screwdrivers feature an All-Metal Core for up to 4X strength. Precision machined tips provide secure fitment and long life. The extended reach design and longer shanks deliver improved visibility and reach. 360° rotating back caps offer greater control, driving ability and tuning. Additionally, color coded markings allow users to easily ID tool on the jobsite. Chrome plated shanks increase tool life by reducing corrosion and providing superior rust protection.
The Husky Diamond Tip Magnetic Screwdriver Set (6-Piece) is designed to provide up to 4-time more grip than a standard screwdriver on slotted and Philips fasteners. Each magnetic screwdriver features a diamond coated tip that is designed to reduce slipping on new fasteners and increased grip on rusted or stripped fasteners. The screwdriver tips are also magnetized to help keep the fastener in place when working in tight access areas. The color-coded dual material handles feature a large size marking stamped into the base of the driver making them easy to identify. With three slotted screwdrivers and three Philips screwdrivers, this magnetic screwdriver set will get the job done.
This Variety Screwdriver Set from Husky includes 3 slotted head and 3 Phillips head screwdrivers. Each blade is forged from high strength alloy steel for added strength. The non-slip ergonomic handles are resistant to impact and chemicals.
Designed with an impact and chemical resistant handle, this Torx Screwdriver Set includes 5 different screwdriver tips forged from high strength alloy steel. The Ergonomic handle helps reduce user fatigue. Works with most common size Torx fasteners.