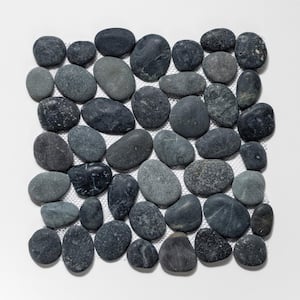
12 in. x 12 in. Mixed Mid-Polish Pebble Stone Floor and Wall Tile (5.0 sq. ft. / case)

- Made from premium-grade natural stones for enhanced durability.
- Natural stones vary in color and offer a unique design look.
- Suitable for multiple projects like kitchens, bathroom, etc.
- View More Details
Free & Easy Returns In Store or Online
Return this item within 90 days of purchase.
Get an answer now with AI
AI-generated from the text of manufacturer documentation. To verify or get additional information, please contact The Home Depot customer service.
Product Details
About This Product
Rain Forest Mixed Mid-Polished Pebble Stone Floor and Wall Tiles incorporate smooth beautifully polished mixed pebbles mounted to a flexible mesh backing. Perfect for interior or exterior projects, Pebble Tiles create a beautiful and unique decorative mosaic look. Add a custom touch to all your floor and wall projects. Tiles are easy to install and use traditional tile grout.
Highlights
- Natural stones vary in color and texture and offer a unique design look for your project
- Suitable for multiple pebble floor tile and wall projects including kitchens and backsplashes, bathrooms and showers, and accent walls
- Suitable for indoor and outdoor commercial and residential uses
- Each case contains 5 tiles and covers 5 square feet; each case weights approximate 20 lbs.
- High quality natural pebble mosaic tile for floor, wall and countertop use
- 12 in. width x 12 in. length, mesh-mounted mosaic pebbles
- Natural finish ready for sealer
- Frost resistant for indoor or outdoor applications.
- It is recommended to add 10% to the project square foot requirement for design cuts and pattern options
- To fully complete your project, remember to purchase, grout, backerboard (where needed) thin set, installation tools and stone sealer
- All online orders for this item ship via parcel ground and may arrive in multiple boxes
- Use a latex-modified thin set for acceptable bond strength
- Return Policy
Product Information
Specifications
Dimensions
Approximate Tile Size | 12x12 |
|---|---|
Product Thickness (mm) | 12 mm |
Details
Application Location | Backsplash, Floor, Wall |
|---|---|
Color Family | Brown |
Color/Finish | Brown/Polished |
Edge Type | Wavy |
Flooring and Tile Look | Stone Look |
Flooring Product Type | Mosaic Tile |
Indoor/Outdoor | Indoor, Outdoor |
Location | Bathroom, Fireplace, Floor, Garage, Kitchen, Shower |
Mosaic Pattern | Pebble |
Returnable | 90-Day |
Shower Floor Compatibility | Compatible |
Tile Features | Chemical Resistant, Frost Resistant |
Tile Finish | Polished |
Tile Format | Standard |
Tile Material | Stone |
Water Protection | Water Resistant |
Warranty / Certifications
Manufacturer Warranty | One Year Limited |
|---|
Questions & Answers
Is the bottom of the Mixed Berry pebble sliced also?
How do you grout these pebbles grout float is flat. These pebbles are round and like rocks do you just make your grout thin?
How-to Pebble Grouting Tutorial Grouting pebbles and similarly rounded tiles is a different process than your standard tile grouting, as you can imagine. However, that doesn’t mean it’s harder! With the proper tools and technique, grouting pebbles is a relatively quick and easy process. The items you’ll need include: • Rubber gloves • 1” bristled brush • Sponge • Grout! Follow our easy 9 step guide for the perfect results. Step 1: Apply your grout Step 2: First sponging with your sponge Step 3: The pebbles should be visible through the grout after the first pass with the sponge Step 4: Sweep out more of the grout with your bristled brush Step 5: Use a circular motion and continue to brush the grout Step 6: The 1” bristled brush will help you recess the grout between the pebbles Step 7: The grout should now be recessed to the appropriate depth Step 8: Pass over the pebbles with your sponge for a final sponging Step 9: Admire your handiwork!
what type of adhesive is used for sticking them on the wall?
We recommend using a modified thinset mortar. Check out the many different options available on homedepot.com! https://www.homedepot.com/s/modified%20thinset%20mortar?NCNI-5
what kind of grout sealer and stone sealant would be best for this tile on a shower floor?
We recommend using a penetrating grout sealer and stone sealant. Grout in a shower floor is exposed to standing water, soap, and humidity. A penetrating sealer soaks into the porous grout, filling its voids to block water and stains while allowing vapor to escape. You may find a variety of options available by visiting your local Home Depot or online at homedepot.com.
Can these be used in a sauna for the floor?
Hello thank you for submitting your question with us. While the tile itself can be used in various Kitchen and Bath settings, you may want to consult your local Home Depot expert to confirm if the Grout will support a project where there will be heavy steam and moisture conditions. To make sure the Grout will cure properly and not experience performance issues.
Are the berry ones polished? It says polished in one place and not polished in another.
Hello thanks for inquiring about the Tile. Yes this tile is mildly polished to enhance color and provide a smooth appearance. This tile will not have a shiny finished look. Mid-Polish tile like the one in the Link below will have a shiny finish - https://www.homedepot.com/p/Rain-Forest-12-in-x-12-in-Mixed-Mid-Polish-Pebble-Stone-Floor-and-Wall-Tile-5-0-sq-ft-case-PT-MPMIX/305325158?MERCH=REC-_-brand_based_collection-_-315083961-_-3-_-n/a-_-n/a-_-n/a-_-n/a-_-n/a
What size trowel?galoolie
Hello thank you for submitting your question. Please call or visit your local Home Depot store and speak with a Tile & Grout pro to learn obtain their recommendation and learn about trowels they have in stock. https://www.homedepot.com/s/grouting%20trowel?NCNI-5
what is pei?
Hello thank you for submitting a question concerning Polished Tile. We are not familiar with "PEI" in reference to Tile. Can you confirm your question and elaborate, please ? Thanks
Viewing 1-8 of 45
Customer Reviews
4.4 out of 5
5
114
4
15
3
8
2
6
1
13

Loading Recommendations
Related Products

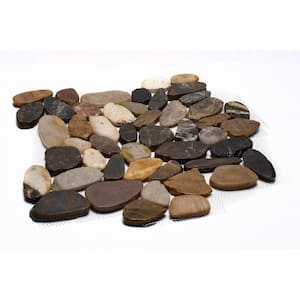
12 in. x 12 in. White Natural Pebble Floor and Wall Tile (5.0 sq. ft. / case)
Rain Forest White Natural Pebble Stone Floor and Wall Tiles incorporate smooth beautifully polished mixed pebbles mounted to a flexible mesh backing. Perfect for interior or exterior projects, Pebble Tiles create a beautiful and unique decorative mosaic look. Add a custom touch to all your floor and wall projects. Tiles are easy to install and use traditional tile grout.
Classic Pebble Tile Black 11-1/4 in. x 11-1/4 in. x 12.7 mm Mesh-Mounted Mosaic Tile (9.61 sq. ft. / case)
The Classic Pebble Tile 11-1/4 in. x 11-1/4 in. Natural Stone Floor and Wall Tiles are made from natural Indonesian stones. With aesthetically pleasing shades and colors these 12 x 12 in. tiles interlock to create a seamless surface. Other companies create jumbled and uneven tiles using pebbles of all sizes and shapes. We carefully choose the best looking pebbles and then slice them on the back to create an even surface for easy installation and a superior finished appearance. Simply the best pebble Tile you can buy online.
12 in. x 12 in. Mixed Sliced High-Polish Pebble Stone Floor and Wall Tile (5.0 sq. ft. / case)
Rain Forest Mixed Sliced High-Polish Pebble Stone Floor and Wall Tiles incorporate smooth beautifully polished mixed pebbles mounted to a flexible mesh backing. Perfect for interior or exterior projects, Pebble Tiles create a beautiful and unique decorative mosaic look. Add a custom touch to all your floor and wall projects. Tiles are easy to install and use traditional tile grout.
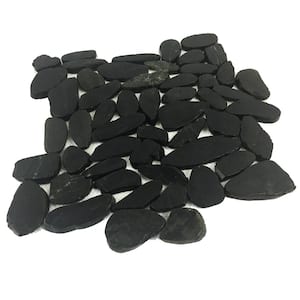
12 in. x 12 in. Black Sliced High-Polish Pebble Stone Floor and Wall Tile (5.0 sq. ft. / case)
Rain Forest Black Sliced High-Polish Pebble Stone Floor and Wall Tiles incorporate smooth beautifully polished mixed pebbles mounted to a flexible mesh backing. Perfect for interior or exterior projects, Pebble Tiles create a beautiful and unique decorative mosaic look. Add a custom touch to all your floor and wall projects. Tiles are easy to install and use traditional tile grout.


