12 Easy Steps: How to Tile a Shower

Published December 26, 2024
Planning on tiling shower walls this weekend? Give your shower an update with new tile. Shower tiling is a DIY project that requires time, patience and some specialized tools. Use this guide for step-by-step instructions on how to tile a shower. Read on for tips on how to choose your shower tile, removing shower tile, safety and more.
Tip: Consult your local building code for any required specifications.
Difficulty:
Intermediate
Duration:
Over 1 day
Table of Contents
Choosing Shower Tile
Gather Tools and Materials
Strip the Shower
Initial Wall Prep
Finish the Wall Prep
Align the Starting Point
Choosing Shower Tile

Shower tiling lets you create a beautiful, durable shower space. The first part of learning how to tile a shower is knowing how to select the right tiles.
First, make sure the shower tiles for your walls are made of glass, porcelain or other waterproof materials. You don't want to use a porous tile like natural stone. For a shower floor, choose a tile that’s designed to be slip resistant when wet. Most tile manufacturers feature a DCOF rating that lets you know how slippery a particular tile can get. The higher the DCOF number, the more slip-resistant the tile. In addition, consider installing smaller tiles on shower floors. The extra grout lines will also help prevent slips.
Gather Tools and Materials

Before you start your shower tile installation, get organized. You’ll need:
- Tiles
- Wet tile saw or tile cutter
- Cement board
- Vapor barrier
- Thinset mortar
- Notched trowel
- Silicone caulk
- Waterproofing membrane paint
- Fiberglass mesh tape
- Tile spacers
- Cement board screws
- Level
- Drill
- Pry bar
- Hammer
- Plastic sheeting
- Wire cutter
Strip the Shower

Now it’s time to prepare the work area:
- Remove all shower accessories and hardware. Leave the shower pan in place if possible. Cover it with a blanket or towel to prevent damage.
- Remove the tile and backer board down to the studs. If needed, use a hammer, chisel and prybar.
- Use wire cutters if you find a metal mesh layer behind the backer board.
- Remove the wall in small sections to prevent injury or accidental damage.
- Remove the demo debris and use a wet/dry vacuum to clean up the remaining tile and mortar dust.
Initial Wall Prep

- Make sure the framing is structurally sound and adequately reinforced at the corners.
- Determine the layout of the cement board (vertical or horizontal installation). The edges of the board that are parallel to the frame must be supported by a structural framing member.
- Install a 4-mil plastic vapor barrier just above the shower pan before installing the cement backer board. Follow manufacturer's instructions.
- Measure your panels of cement backer board to fit the shower walls on each side. If needed, mark and cut a panel to fit. Smooth the cut edge.
- Install boards 1/4-inch above the floor, tub or shower pan and caulk accordingly.
- Fasten cement board with the appropriate nails or screws, according to manufacturer’s instructions. Set fastener heads flush with the surface, without overdriving.
- Be sure the cement board is flush with the tile lip of the base. If needed, nail composite shims to the studs behind the board to ensure the fit.
- At the front width of the shower stall, use a hole saw to cut out the spaces in the backer board where the new fixtures will be installed.
- Attach to the studs.
Finish the Wall Prep

- Seal the gap between the panels with silicone tile caulk.
- Apply a strip of fiberglass mesh tape over each seam and in the corners. Staple into place.
- Apply a coating of thinset tile mortar over all the mesh tape.
- Keep the application as flat and even as possible to prevent buildup.
- Tape joints prior to tiling. Fill all joints with mortar.
- Push fiberglass mesh tape in the mortar and level.
- Apply two coats of waterproofing membrane paint over the entire surface you intend to tile.
- Allow the paint to dry between coats.
- Fill in any small gaps with a second application of silicone caulk or mortar. Refer to the manufacturer’s instructions.
Align the Starting Point

- Begin the bathroom tiling installation with the second row up from the bottom. If the shower base is uneven, cut the tiles to fit the last row.
- Draw a leveled line where the bottom of this initial row will fall.
- Attach a straight board to the backer board along the line. This will provide a straight edge for the tile to follow and help support it while it dries.
Mix Thinset Mortar

- Mix thinset mortar according to directions.
- Use a drill with a paddle bit attachment to mix the mortar in a bucket.
- Allow to set for seven minutes, then mix again. The final mixture should be the consistency of peanut butter.
Only mix or remove enough thinset for each row you are tiling. Don't let the thinset dry out before it is applied. If so, the hold won’t be strong enough for the tile.
Tip: Save time by using pre-mixed thinset mortar. Remove a small amount at a time and reseal the container.
Complete a Tile Row

- Run a damp sponge over the backer board in the area you intend to tile.
- Spread thinset along the first section of your tile row.
- Turn over the trowel to the notched side and comb over in one direction.
- Use a small amount of the excess mortar and spread it onto the back of a tile with the notched side of the trowel. If using small tiles, you can skip this step.
- Press the tile into the mortar gently but firmly, aligned along your board guide. Wiggle it gently to help it settle into the mortar.
- Insert a tile spacer.
- Repeat the process to add the next piece of tile.
- Continue adding tiles to the row until it is complete. When you come to the corner, mark and cut the tile to fit into the final space.
- Allow this initial row to dry and cure overnight. This will help anchor the subsequent rows.
Complete Tile

- Start a new row above the initial row you placed and continue setting tile as instructed.
- Cut as needed with tile snips or a wet tile saw to allow tile pieces a better fit around shower faucets and shower heads.
- Check the tile line with a level often to be sure it is straight.
- For exposed edges, set edge trim or bullnose tile pieces in place.
- Once only the bottom row is remaining, remove the support board.
- Measure and cut tile pieces to fit the bottom row.
- Avoid having the bottom of the tile flush with the bottom edge of the cement board.
- Leave about a half inch of overlap on each tile.
Grout Tile

- Once the bathroom tiling has set and cured for 24 hours, remove the tile spacers.
- Mix up your desired grout color according to manufacturer's directions.
- Using a runner float, apply grout to small areas at a time.
- Drag the float diagonally to work the compound into the joints.
Clean Tile and Seal Grout

- Let the compound dry for 10 minutes.
- Wipe away excess with a damp sponge but don’t wipe it out of the joints.
- Complete the grout, working upward in small sections.
- Allow the grout to dry.
- Remove the haze from the tiles with a haze remover.
- After three days, seal the grout.
- Add silicone caulk to the corners, edges and floor joints of the shower.
Replace Shower Fixture (Optional)

Shower fixtures control water flow and temperature. They're also the perfect finishing touch for your newly tiled shower. Shower fixtures come in many styles, finishes and have various functions. Finishes like chrome, brass, nickel and stainless steel are the most popular. Some require more maintenance than others. Keep these things in mind when thinking about new shower fixtures:
- What matters most to you in a shower head? Strong water pressure, a light rainfall or a flexible handle?
- Do you prefer a modern, classic or traditional look?
- Consider installing shower fixtures that have adjustable flow rates and save water.
Tip: Consider adding a new glass shower door to show off your new shower tile.
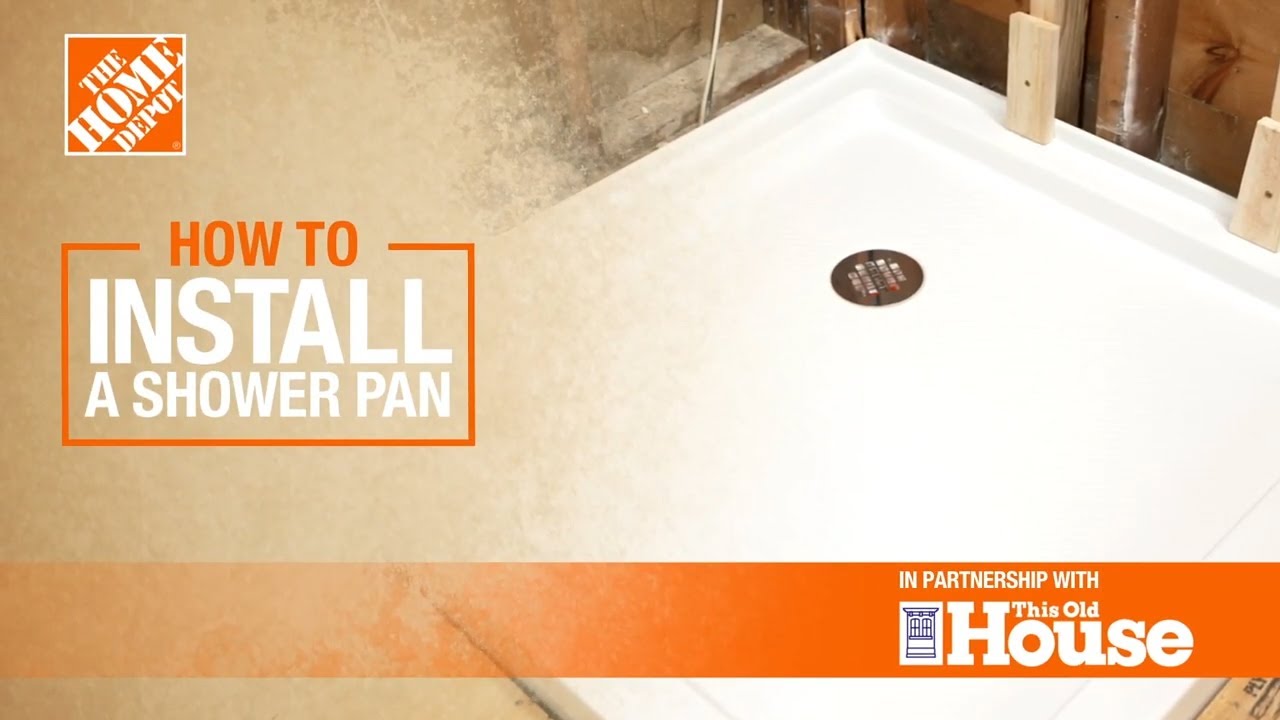
Shower Pan Options

Most showers have an existing shower floor or pan. When tiling shower walls, you can simply replace the existing tile or build a new shower pan from scratch. Just make sure that when you build your shower pan, you slope it properly for drainage. You can also just go with a pre-built shower pan. Virtually leakproof, readymade shower pans are made from durable and practical acrylic or fiberglass.
Shower Tiling Facts & Safety Tips

Shower tiling includes everything from removing old tiles to cutting and installing new tiles. Use these tips to help keep the job on track:
- Keep your tile saw blades sharp. A dull blade can slip and cause damage.
- Cutting tile for a shower is precise work. Always measure twice.
- Fit tile pieces together correctly. Gaps can lead to water problems in your bathroom’s inner wall.
- Choose an epoxy-style grout. This will minimize the occurrence of mildew and mold stains.
- Wear skid-proof shoes, kneepads and gloves.
- When using a tile saw, wear safety goggles, a dust mask and ear protection.
Tiling shower walls can increase the beauty and function of your bathroom. Make sure to choose waterproof tiles for your walls and slip-resistant ones for your shower floor. Plan your shower tiling project out and take your time. Ready to start your next tiling project? The Home Depot delivers when and where you need it. Or if you'd rather not do it yourself, let our professionals handle your next shower tile installation project.