Make the Most out of Autumn Leaves & Pinecones for Your Friendsgiving Table

Last updated August 21, 2024

Cynthia Ruff is a self-domesticated city girl living in Atlanta, GA that shares how-to DIY projects for your home, create heirloom recipes, and occasionally showcases places she loves in the South on her blog, Darling Down South. She's currently learning how to install panel molding in her 1920's condo and learning Python to continue building out her tech startup.
A Note From The Home Depot
The holiday season is upon us, and there’s no better way to kick things off than with a wonderful Friendsgiving celebration! Of course no celebration is complete without great decor, and our resident DIYer Cynthia Ruff can show you how you can create a stylish, Friendsgiving table that’s sure to impress!
Table of Contents
Make the Most out of Autumn Leaves & Pinecones for Your Friendsgiving Table
Foraged Pinecone & Leaf Garland
Make the Most out of Autumn Leaves & Pinecones for Your Friendsgiving Table
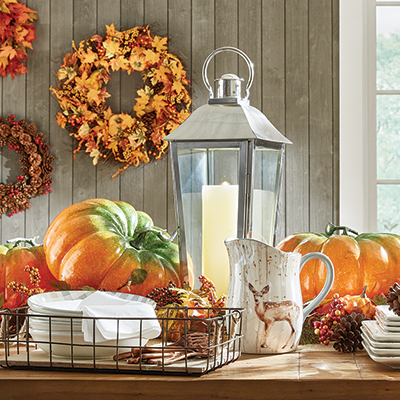
There is so much to celebrate at this time of year, but I’d say Friendsgiving is one of my favorite holiday kick-off events. Maybe it’s because all of my friends feel like family or maybe it’s because everyone in our group is an exceptional cook who pulls out all the stops (and their grandma’s secret recipe). Who knows?! What I do know is that if you’re going to have a big party, you want it to look as amazing as it tastes. So I’ve put together this fun and inexpensive DIY for you to really wow the table for your own Friendsgiving.

Foraged Pinecone & Leaf Garland
For this project, you will need: one ball of twine, hot glue, floral wire, fairy lights, 50-75 foraged leaves & pinecones, leftover mums, rosemary, and other herbs.
Step 1: Wash your leaves after collecting them. I set them in a colander and sprayed them down, then transferred them to a dish towel to lay flat. This helps remove any dirt or bugs that may be lurking.
Step 2: Lay a tablecloth down as the base for your craft. Since the leaves are delicate, it’s best to leave them where they lie and not have to worry about transferring them once you’ve assembled everything.
Step 3: Cut a piece of twine as long as the length of your table plus 6 in. on either end.
Step 4: Determine the mid-point of the table and lay the pinecones spaced about 6-10 in. (depending on how many pinecones you gathered) alternating the sides of the garland. Save half of your pinecones for Step 8.
Step 5: Using the green floral wire, wrap the wire through the lower open pinecone scales, twist to secure and then secure the pinecone to the twine with the wire, twisting it into place.
Repeat for all pinecones on your twine.
Step 6: Hot glue a cluster of leaves together before securing to the back of the twine and behind the pinecones. It’s easier to pre-hot glue the leaves together in groups and then secure to the twine at once rather than laying each leaf individually.
Repeat for the entire length of the twine. Save a few leaves for step 7.
Step 7: Hot glue leaves on top of the twine to hide the twine and create a more natural look.
Step 8: With the remaining pinecones, hot glue them onto the pinecones already secured to the twine to create some depth and height to the table runner.
Step 9: Interlace the fairy lights between the pinecones and the leaves. Use floral wire to secure the battery pack to the edges of the twine.
Step 10: Using some leftover mums and other fall herbs (like rosemary and thyme), fill in the empty spaces on your garland with some additional fall color and fragrances. Be sure to do this last as you want your flowers to stay as fresh as possible for your guests.
Step 11: Brush off any leaves that may have broken while you were working and enjoy your leaf garland.

There you have it! An easy and family-friendly natural table runner to really wow for your Friendsgiving celebration.
I like keeping my centerpieces for sit-down dinners low so that you don’t have to compete with it to talk to your guests. This garland can also be used as a buffet garland whether you drape or set it between the dishes your friends bring over.

As for setting the Friendsgiving table, I like using a lot of different textures and patterns. These placemats worked perfectly as the base for these seasonal paper plates. If you’re doing a sit down dinner, I like putting little touches on each person’s place setting like these little gourds with “Thankful” banners attached.

If you’re doing a buffet-style setting, it’s nice to have the napkins and silverware already pre-packaged for each guest. Use some leftover twine from the table runner to secure a fork and knife inside the napkin with a little bow and decorate with seasonal elements (like mums and herbs).

I wanted this table to feel like the magic of sitting under a tree in Autumn, with all the whimsy and magic that happens as the leaves begin to gently float down. Recreate this table for your Friendsgiving and delight in the warmth of being together again for the holidays.


This post was created in partnership with The Home Depot. The author may have received compensation for this article and associated images or video, potentially in the form of products and/or services. All expressed opinions and experiences are the author’s own words.