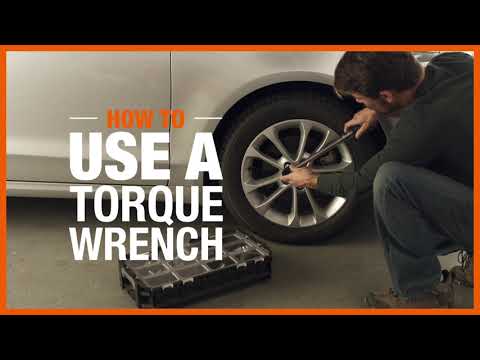
How to Use a Torque Wrench
Last updated September 7, 2023
A torque wrench is a staple item found in many toolkits. Typically used for automotive or machinery repairs, there are times when a high-quality, calibrated torque wrench is considered the ideal instrument for the job. If you’re new to certain DIY tasks, you may first need to learn how torque wrenches work or which one is right for the job. This guide will explain how to use a torque wrench and choose the right one for your needs.
Difficulty:
Beginner
Duration:
Under 2 hours
Table of Contents
What is a Torque Wrench?
How to Use a Digital Torque Wrench
How to Use a Dial Torque Wrench
How to Use an Adjustable or Click Torque Wrench
Torque Wrench Maintenance
What is a Torque Wrench?

- A torque wrench is a tool used specifically to adjust nuts and bolts. It offers additional leverage for tightening difficult and hard-to-reach parts, making it a go-to piece for auto mechanics, electronics specialists and machinery repair professionals.
- Many people keep one handy at home for basic tasks like tightening lug nuts.
How to Use a Digital Torque Wrench

Designed to take the guesswork out of learning how to set a torque wrench correctly for a particular job, digital varieties do much of the work for you. Digital torque wrenches can ensure that you always have the correct torque setting for the job at hand, leading to less issues down the road.
Digital torque wrenches are commonly used in manufacturing and production facilities where extreme precision is key, but they can be used in other capacities and at home as well:
- Step 1: Set the torque value on your digital torque wrench. Most models feature a “SET” button and up or down arrows that allow you to change the torque value.
- Step 2: Program the tolerance parameter to control the “Go” and “No-Go” signal responses. Set the upper and lower thresholds for safety and quality control purposes.
- Step 3: Place your torque wrench and begin making adjustments. On most digital torque wrenches, a buzzer or light will indicate when you should stop applying torque.
- Step 4: Check your reading. Most digital torque wrenches use a green light to let you know the correct torque has been achieved. A red light indicates the torque was not within the correct tolerance zone.
How to Use a Dial Torque Wrench

Dial torque wrenches offer a higher level of accuracy when tightening bolts on machinery or vehicles. Often used in production and repair facilities, using a dial model offers quality control. Many people also use these for adjusting important nuts and bolts, like those holding your car tires in place.
You can easily find basic 7-inch pound torque wrenches, and 1,500 foot pound varieties are also available depending on your needs:
- Step 1: Set your torque wrench value to the desired torque setting based on the job. Some models feature a double-end drive that can be used for tightening and loosening.
- Step 2: Position the torque wrench on the nut or bolt and begin making adjustments. Many models feature a light or beep that will sound when you’ve reached the correct torque setting.
- Step 3: Check your torque reading as you go if your model is not fitted with a light or auditory sensor. You’ll need to keep the gauge in view as you turn the torque wrench to see the readout. Stop turning your torque wrench when the correct torque has been reached.
Tip: If you’ve never used a dial torque wrench before, take a few practice turns with your new tool to see how it works before you take on an important job. You’ll quickly learn how to read a torque wrench of this type so you can use effectively.
How to Use an Adjustable or Click Torque Wrench

An adjustable, click-style torque wrench is a simple tool that can be used to make adjustments to your car or other heavy-duty products. While the process is a bit different, it’s easy to grasp. Here’s how to calibrate a torque wrench of this type and use it for your next job:
- Step 1: Choose the right type of torque wrench for the job. A 1/2-inch torque wrench or 3/8-inch torque wrench will be able to handle most jobs like engine repairs, head gaskets, tires and brakes. A 1/4-inch torque wrench may be ideal for more precise jobs.
- Step 2: Check your bolt for the correct torque to set your wrench properly. For example, a bolt may say “100 pound feet.” This means you’ll need to adjust your wrench handle by loosening the release at the bottom and turning it until it the “O” lines up with the correct torque specification. You should see clear markings above the handle grip to indicate what torque specifications are available.
- Step 3: Tighten the release at the bottom. This will lock your torque wrench at the correct setting.
- Step 4: Put the torque wrench in place to make your adjustment. Turn the torque wrench until you hear two clicks. This means the correct amount of torque has been reached.
Torque Wrench Maintenance

- Torque wrenches can withstand much wear and tear, and the performance may begin to fade over time. If this happens, take it to a repair shop that can accurately handle the calibration of torque wrenches.
- Choose a professional who understands how to set a torque wrench accurately.
Many automotive or machinery repairs require a torque wrench or calibrated torch wrench. Owning the tools you need is a major part of keeping your car running. Round out your tool box with a torque wrench or other tools. Use The Home Depot Mobile App to locate products and check inventory. We'll take you to the exact aisle and bay.