DIY Christmas Village

Published November 17, 2023

Hi, I'm Raftyn you can find me on Instagram @RignellRanch! I am a content creator in the home design & DIY niche, with a sprinkle of lifestyle and a huge splash of FUN! Together with my handy husband, we are renovating our 1880s farmhouse and recently embarked on a new adventure, a cabin on the lake! We love updating our old home and are not afraid of a good fixer upper. Be sure to follow along as we create the home and cabin of our dreams, one DIY project at a time.
A Note From The Home Depot
Looking for a fun new DIY to try this season? Read along as Raftyn of Rignell Ranch shows how she creates a DIY Christmas village!
Table of Contents
Gather Your Supplies
Sand, Pre-Stain and Stain
Painting the House Details

When it comes to seasonal decorating, Christmas is by FAR my favorite! Christmas is a time to have some FUN when decorating your home and one way to do that is to add some DIY holiday décor to your collection. In this blog post I am going to show you how to make your own DIY Christmas Village! Spoiler alert…it turned out SO GOOD!
Gather Your Supplies

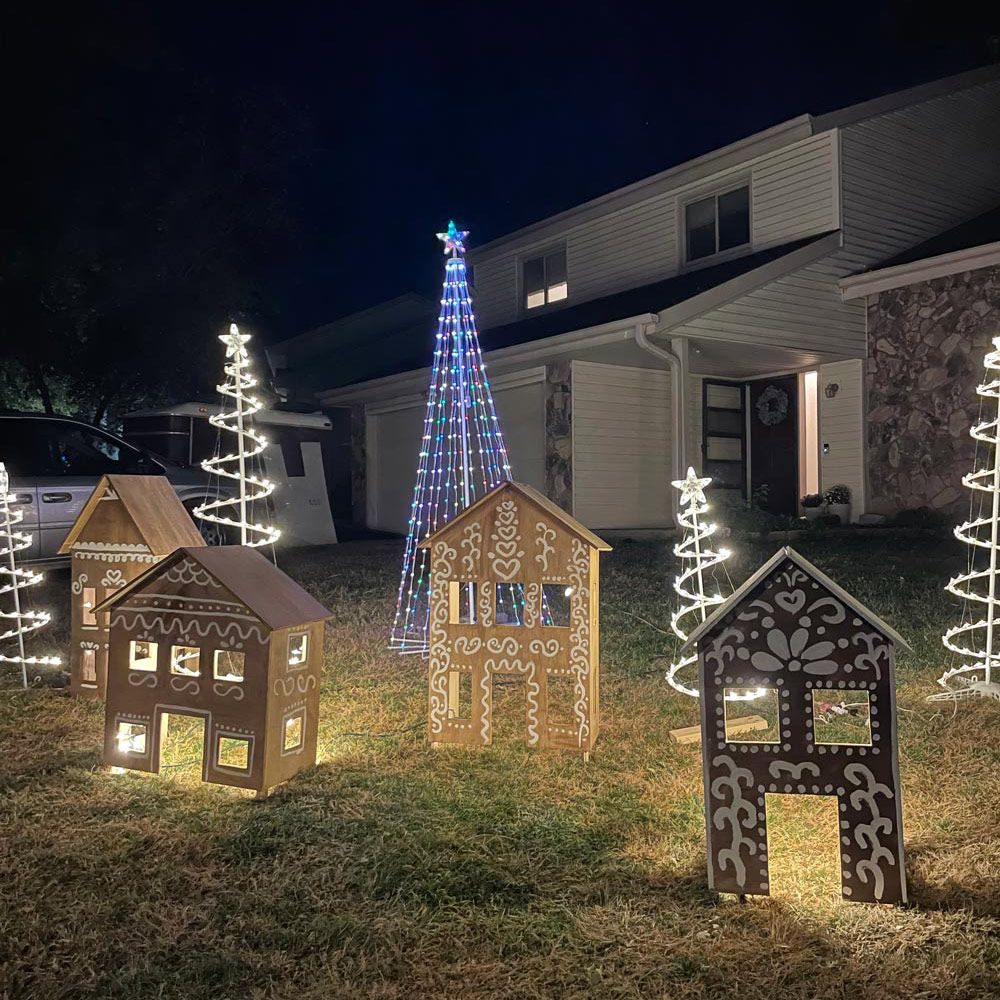
I ran to The Home Depot and got all my supplies for this project. I wanted an inexpensive piece of wood, so I chose this ¾ inch sanded plywood. Since I am not making a base for them to stand up, I wanted the thickness of the ¾ inch plywood so they wouldn’t tip over. The 4x4 sheet of plywood ended up giving me PLENTY of wood to make the number of houses I wanted. Depending on how many houses you want to make you can get a bigger or smaller piece of wood. I started by ripping down the boards on our table saw at varying widths. I made two different widths of boards for my houses, 5 inches and 6 inches. Once the boards were cut, I found the center and drew a line at an angle to make the peak of the house. I used our jigsaw to cut the angle on the tops, also cutting them at different heights. The height you choose will depend on where you want to put them. My tallest house is 13 inches at the peak and my shortest one is 7 inches with a few in between. If you don’t have a jigsaw, you could also use a circular saw. The Home Depot has a great variety of table saws, circular saws and jigsaws for all your wood projects.
Sand, Pre-Stain and Stain

Once all my houses were cut I lightly sanded each one with a sanding block to smooth out the rough edges. I recommend using wood conditioner before staining. Wood conditioner helps your wood accept the stain better, allowing for a smoother less blotchy finish! I tried a few different stain colors at first, Provincial and Weathered Oak by Varathane. I ended up liking Weathered Oak the best as it was a very pretty, natural wood color. I got this multi-pack of foam brushes and plastic gloves to use when applying the stain.
Painting the House Details

Once the stain was dry it was time for the fun part, drawing on the house details! I enjoyed this part SO MUCH! To draw on the details, I used this thicker bold point paint pen to fill in the bigger designs and the medium point paint pen for the more detailed parts. I tried to make each house look a little different by drawing the windows and doors in different sizes and shapes. I also added other details like snow on the roof line, window boxes, fencing, wreaths, Christmas lights and more! For a more layered look, you can go back over with the paint pen once the first layer has dried and add some extra detail.
I layered the houses on my mantel with my cedar garland and I LOVE how they turned out. I plan to make more and give them as gifts this holiday season! One of my favorite parts of DIY is when someone asks, “where did you buy that?” and I can respond that “I MADE IT!”.

I even saved some for my kids to make. They had the best time getting creative with this project too. The styling options for this easy DIY are endless like I did here on my bookshelf. So, where would you put these Christmas houses this holiday season?
This post was created in partnership with The Home Depot. The author may have received compensation for this article and associated images or video, potentially in the form of products and/or services. All expressed opinions and experiences are the author’s own words.