Dutch Door Refresh

Last updated August 21, 2024

Anthony is the creator of 136home. He's a DIY, home decor, design, and interior styling enthusiast nestled in the heart of San Francisco. He supports a highly engaged community mixing old + new to design a home he loves one detail at a time. He curates affordable finds, shares tips, and helpful DIY's while discussing everything home all day, every day.
A Note From The Home Depot
Let in style and light with a door upgrade from the Home Depot. Watch as Athony Rodriguez of 136 Homefinds harmony between modern and classic, light and security with a Dutch door DIY with help from The Home Depot. Then head to your local Home Depot and give your own door refresh a try.
Table of Contents
Why a Dutch Door?
The Process
The Best Upgrade Yet
When we moved into our 1920s row house, we knew it was the right home for us: tucked into a storybook neighborhood full of charm and plenty of nature. For us, it was the perfect place to put down roots, complete with three full bedrooms, a garage, two baths and a real kicker: the home had a walk-in closet, which makes it a real gem for San Francisco.
As soon as we got the keys, we quickly went to work making the space ours. While it had great bones, I craved some additional historic charm to offset the modern look. I love to mix old and new, and the home didn’t need a ton of work which was nice – I was able to quickly get to work making it mine. I added arches, a fireplace, a breakfast banquette, a bathroom, and even a box molding shelf.


It was looking great, and we made all the upgrades my heart desired. Yet, one upgrade eluded me. No matter what I did or which project was next, it just never seemed like it was the right moment to update my builder-grade door to a new Dutch Style Door.

Why a Dutch Door?
Now, you are probably wondering, “Why? Your door looks fine.” And to that I would say, “You are absolutely right.” However, I just couldn’t shake the desire to make it a “wow” element. The space was bland, and that simply won’t do over here at 136 Home. Interestingly enough, the entry itself perches atop a staircase, screaming to be opened up to let in the light and stunning view of Twin Peaks. After all, who wouldn’t want that view splashing right into their living room. I mean, if you’ve got it, flaunt it!

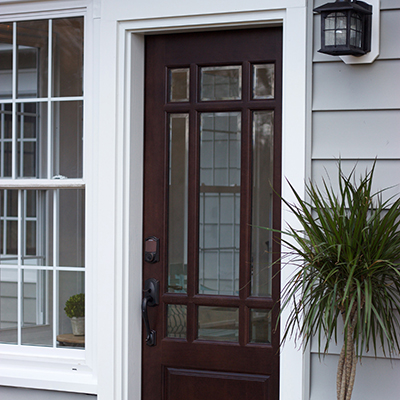
The solution to achieve this was simple—replace our builder-grade door with a brand-new cottage Dutch door. I was beyond excited to work with The Home Depot to make my dream a reality. Adding a Dutch door to any home will instantly infuse an entry with European charm, while still being super functional. Plus, there is the added benefit of being able to open up the top half of the door while keeping the bottom part of the door securely shut. We have a dog and wanted to make sure she couldn’t escape while letting in the view and fresh air.
The Process
I started off by ordering online. It was quick and easy. The Home Depot even comes out and custom measures your door to make sure you get exactly what you need without error. Afterall, you don’t want to get the wrong size, or even worse get the right size but with the hinges on the wrong side. I loved having the security of knowing it was just right. My door came complete with a panel overlap detail shelf because the detail was too cute not to include.

I should note that I ordered an unfinished version, but you can get it in an array of colors and finishes.. It was important to me that I could have the door match my interior and exterior black paint color. I love the look of a black door—they always look good. So, I got to work doing a light sanding with a 220-grit sanding sponge to smooth any rough edges and then applied a few coats of paint. The work went quickly, and it was a fun and enjoyable process. Grab your favorite podcast or a great music playlist.


I did three coats of paint. Don’t worry if the first coat is a little blotchy; it will get there. I then just waited for The Home Depot to return to help me install the new door. It was so awesome to have their support. When they arrived, we simply removed the old door—they even hauled it away for me—and got to work.

Since we were trying to keep the door in its original layout, all we had to do was remove the old molding and previous frame with my favorite jig saw. Thanks to my friends at Home Depot, we made fast work of preparing the new frame in the opened-up space. We used some shims to make sure it was flat and level, which is very important.


During the demolition process of the previous door and frame, I noticed that we had a few inches of space all around where the dry wall and the frame meet. So, I filled in the space with this Loctite Insulating Foam that is fire retardant, insulating and offers water protection. You don’t want a gap between the interior and exterior, so be sure to do this if you have a similar spacing issue.


After the frame was in and the door was sealed, the door snapped into place perfectly. With the frame, screws and hinges that came with the door, we simply drilled back into the previous screw location. We did have to open up the recessed area in one spot where the hinges didn’t line up. But it was easy, and with the help of my friends, it was even easier.


Make sure the door can open and close easily, even test the bolt that keeps the top and bottom part of the Dutch door together. You don’t want them to be misaligned. It took a bit of finesse—I accidentally painted over the bolt! Make sure that you don’t make the same mistake I did, but if you do, simply use a credit card or soft edge to scrape off the paint.


The Best Upgrade Yet
I couldn’t believe my eyes when the final molding was installed. I quickly nailed the final board in place with my brad nailer and literally screamed in delight. The sunlight was already flooding in, making my living room come to life. I then opened the top half of the door and stared out at the mountain peak. It was gorgeous. I just can’t believe how smooth the door opens. It was even better than before!


I am still over the moon about this upgrade and I dare say it’s my favorite yet. It was a project that added form and function, allowing for more light to fill our living room, opening up a gorgeous view, while letting in tons of fresh air for lazy, rejuvenating Sunday afternoons on the couch. Plus, the Dutch door itself is super secure being that it’s double-sided tempered glass. Painting the door black was absolutely the right decision too. It looks stunning.

We spend so much time here watching the clouds float by now. The final result is even better than we had initially envisioned, taking the entire vibe up a notch, adding both value and flare to our home. We kick the mood off right from the start, the moment you walk up our front steps and turn the knob of our brand new Dutch door. In the end, with the right door and a little help from The Home Depot, we got the entryway of our dreams that’s both modern and charming at once. You can, too. Give it a try—you won’t regret it, I promise.
This post was created in partnership with The Home Depot. The author may have received compensation for this article and associated images or video, potentially in the form of products and/or services. All expressed opinions and experiences are the author’s own words.