The Final Bedroom in Our 1861 Home

Last updated August 21, 2024

Morgan Ford married her neighbor and purchased their grandparent’s home! Smack dab in the middle of each other's families farms. They spent the last decade working on fixing the foundation, running new electrical, plumbing, etc. of this 1861 year old farmhouse. If you can think it, they did it. Follow along on their journey on The White Farmhouse Blog.
A Note From The Home Depot
Do you want that stained wood floor look without the stain?
Morgan Ford of The White Farmhouse Blog shows you how to create that beautiful, rich color on your flooring - no stain needed!
Keep reading to see how she did it with the help of The Home Depot.
Table of Contents
The Final Bedroom in Our 1861 Home
The Final Bedroom in Our 1861 Home
One of my most asked questions is, “what is the stain you used on your floors?” The answer is none!


We used an unfinished white oak I bought over a year ago saving for this very moment and finished them with an oil-based polyurethane. After a few back-breaking evenings after work, Doug installed them!


Doug made a point to have me share his favorite tools for this very process. He has laid over two thousand square feet of flooring in our home over the years and certainly has a process and his favorites!

He has used this Dewalt orbital sander for almost ten years now paired with his favorite brand of sandpaper by Diablo.
After the floors were laid he used 120 grit sandpaper and then went over them a second time using 150. Don’t forget to buy a good pair of knee pads and a mask! He makes sure to clean every speck of dust with a shop vacuum and a damp towel before laying the poly with a 1/4 inch nap roller.
After letting the polyurethane dry for a day, he sanded them one more time using 220 grit. I always feel sad when he sands that beautiful first coat of poly, but I know it has to be done for the second coat to adhere well.

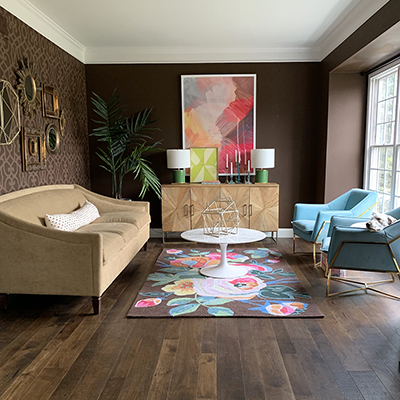
Below is a photo of the final result! We used 2 1/4 inch white oak at a lower grade. Lower-grade boards include boards with more knots, variations in color, etc. These we decided are the closest to matching the original floors we uncovered downstairs in the original home.

The ceiling might even be my favorite part of this room! We used tongue and groove pine boards from The Home Depot. To be honest, Doug wanted a wood ceiling just to hide drywall cracks because not much is worse than drywall mudding if you ask him!
I set them up in the barn first to prime. Then I applied the first coat of paint. Primer is key when using real wood because the knots will bleed through and turn your paint color yellow. We ran the boards opposite of the ceiling trusses to give strength and something to attach to!


We hadn’t fully planned on how to finish this room as far as the ceiling to the wall. I thought the ceiling boards would be put up to the wall and that would be that! But we encountered far too many problems along the way. Crooked walls and a leaning ceiling made this almost impossible to not a trim piece to hide various gaps. Doug came up with an idea to match the thickness of those headers with a 1 in x 2.5 in the wide board. That way we could hide the gaps and transition the shorter ceiling to the head-ers all the while making it look as if we had planned this all!


Finally, I wanted to share a little before and after about this old dresser.
I often get asked how I refinish old furniture and what I use to finish, and the answer is that I have tried a lot of stripping methods and products. So far, they are all a lot of work!
My favorite would have to be this gel stripper from The Home Depot.

It took more hours than I would like to add, but just know if you think stripping is horrible and want to give up, we have all been there! It is! The hubby stepped in and worked on stripping this piece as well. We were excited to see that this dresser was walnut underneath and knew our efforts wouldn't be wasted if we could just get that old varnish off!

We even stripped the wood handles and lightly hand-sanded them to get the rest of the varnish off.

Now isn't that pretty?! I was completely torn on what type of finish to use. This is the biggest decision of all if you ask me because there is no turning back unless you strip and sand all over again! I decided to bring the dresser into the yard for natural lighting to help with my decision. If I used a water-based poly it would keep the dresser this light color you see above, BUT it would show any scratches to the surface with use. Because this dresser is walnut, it had a red undertone that even though the dresser was stripped, it wasn't that yellowish tone I love.
I finally decided to just take a risk. I knew oil would darken greatly as this dresser is walnut, but I did not know how dark it would be. I loved the idea of using oil because it can be re-applied as needed over the years. I also love how the wood grains pop and how the wood soaks in the wood. I wanted to let this dresser show its true colors and finally just went for it. If you are ever nervous about what oil would do to wood, always try on the backside or underneath the piece before making a decision. I had tested the inside of a drawer and the backside of the piece and finally just went for it!

I’ve had this dresser in the barn for months. Envisioning what it would look like someday. Slowly working on it during the week. All the time knowing this was the perfect dresser for this little nook.

This post was created in partnership with The Home Depot. The author may have received compensation for this article and associated images or video, potentially in the form of products and/or services. All expressed opinions and experiences are the author’s own words.