Product Images

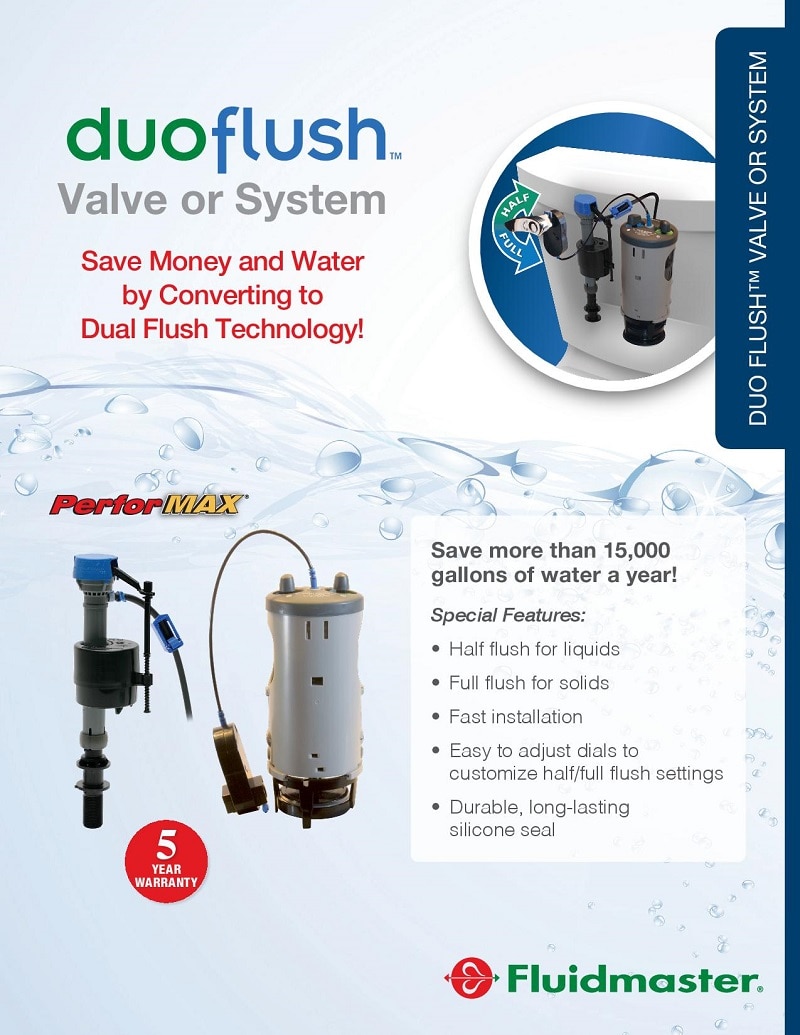
- Convert your toilet to a dual flush water-saving system
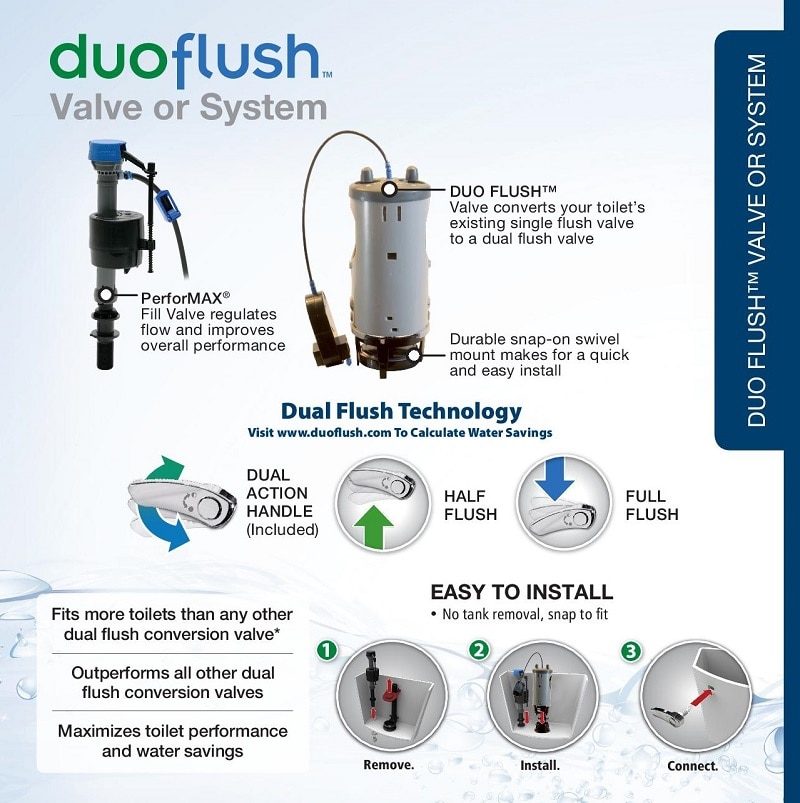
- Easy install for 2 in. valves, without removing the flush valve
- Fully adjustable, includes the high powered PerforMAX fill valve
- View More Details
Free & Easy Returns In Store or Online
Return this item within 90 days of purchase.
Ask about this product
Get an answer now with AI
Magic Apron Assistant is an AI virtual assistant. By proceeding, you consent to the recording and use of your information by The Home Depot (and authorized third parties). More information
Product Details
About This Product
The Fluidmaster 550DFRK-3 Duo Flush System Toilet Converter gives you a tool to help save on water use and water bills. A complete toilet fill and dual flush conversion kit that retrofits into any 2 in. flush valve toilet. Instructions included for hassle free and easy installation, which doesn't require removing your toilet flush valve. Designed to be high performance and adjustable toilet repair kit suitable for most toilet models. The included PerforMAX fill valve regulates water flow and improves overall performance. Capable of both full and half flush, with a wide range of settings, this toilet flapper replacement features a durable build and an included 5-year warranty. Parts included: Dual Action Handle, PerforMAX Fill Valve, DUO Flush Valve, Refill Clip, Refill Tube, Shank Washer, Fill Valve Locknut, Angled Seat Adapter (optional), Dual Action Handle Locknut, Roller Clamp, and Hose Clamps. The Fluidmaster Dual Flush Conversion System, everything you need to maximize your toilets performance, while using up to 45% less water than the original tank parts.
Highlights
- Uses up to 45% less water
- Easy install without removing the valve, and fully adjustable for a wide range of settings
- Retrofits to any 2 in. flush valve toilet, fits most 1.6, or 3.5 GPF models
- Upgrade your noisy, slow filling and inefficient toilet systems
- PerforMAX high performance fill valve replacement included for 2x greater refill rate
- Full and half flush, dual action toilet flush lever included
- 5 year warranty
- Complete fill and dual flush conversion system is designed to enhance your toilets performance
- Return Policy
- California residentssee Prop 65 WARNINGS
Product Information
Specifications
Dimensions: H 13.125 in, W 8.188 in, D 4.25 in
Dimensions
Product Depth (in.) | 4.25 in |
|---|---|
Product Height (in.) | 13.125 in |
Product Width (in.) | 8.188 in |
Details
Application | Bidet |
|---|---|
Color/Finish Family | Assorted Colors |
Included | Hardware Included |
Material | Plastic |
Pack Size | 3 |
Plumbing Part Type | Toilet Kit |
Returnable | 90-Day |
Toilet Repair Kit Type | Dual Flush Conversion Kits |
Warranty / Certifications
Manufacturer Warranty | 5-year warranty |
|---|
Questions & Answers
Will it work to put the handle on the side?will it work on a alger toliet
Don't see why not.
Why are all reviews several years old? If there were new satisfied reviews that might indicate problems with the product fixed.
It has been a few years (can't remember how long) since I installed those parts. I do know that the installation went smoothly, and everything has worked well since. Sorry I can't be more specific.
I originally installed 3 of these products about 10 years ago. They worked well for the first year or so. Then there were problems. The main plunger wouldn't seal after a flush. After a while the cable pulled out of the flushing handle. After that I pulled these and installed standard flushing equipment. I could not get the original equipment for my toilets so I had to make do. Finally about 2 years ago I decided to give FLUIDMASTER another try. The New ones have been redesigned. The entire design is much better and I now have them on all three of my toilets. No more problems with flushing. I highly recommend the newer version of this product.
I don't have a good answer for that question, but I will offer my review. My system is about 3 years old, and I have to admit that I had trouble with it at first. It would not stop filling the bowl and i had to stop it manually, which was very inconvenient. I finally realized that the problem was the filler system (the blue component). It must be adjusted to where is is 3 inches higher than the fill tube. Since I made that adjustment I have had no problems.
I replace my flush system after my cable broke my old one I had it about 6-7 years. Love it works great. It has a high flush and a low flush no problems.
Because they last for a long time. Mine last is 6 or 7 years.
Flush valve leaks, sealant is doing its job but it seems to leak where the valve seats. How can I correct this? the instructions were pictures with a short caption and are useless, any special alignment or return it and go back to the Danco system? It's Friday night and customer assistance does not open until Monday.
You have to follow the instructions. The instructions where very clear that you have to let it sit and make sure the area is clear and dry.
Fluidmaster would like the opportunity to learn more about your installation and provide help. Here is a quick tip that may solve your problem; the tank lever may not be inserted all the way through the tank mounting hole which can allow the piston to stay open causing a leak. The handle comes with an optional spacer that if used may be keeping the handle from going all the way through the tank. Take a look at the handle on the outside of the tank if is more than 3/16 of an inch away from the tank wall then we suggest removing the handle checking if you are using the spacer and if so remove it. If you need help please contact Fluidmaster’s Technical Service Department, we are available Monday through Friday from 5:30 AM through 5:00 PM Pacific Standard Time. Contact options include: Chat www.fluidmaster.com/support E-Mail techsupport@fluidmaster.com and Toll Free 800-631-2011.
I have had the same issue and believe that their valves don’t seat well. Mine leaks and refills a sour every 8 hours.
i have a kohler toilet model UPC K4438 which is a 1.28 GPF unit. Will this fluidmaster 550DFRK-3 conversion kit work on that toilet ... it appears to be a 2" valve.
It should work on any standard toilet.
The Kohler K4438 toilet tank uses a canister flushing system called the Kohler Aquapiston. That system unfortunately cannot be replaced by the Fluidmaster 550DFRK-3. The reason being, is Kohler made the Aquapiston a specific size that is neither a 2" or 3", therefore replacing it with our Duoflush simply would not work. If you have any further questions, feel free to contact Fluidmaster's Technical Service Department, we are available Monday through Friday from 5:30 AM through 5:00 PM Pacific Standard Time. Contact options include: Chat www.fluidmaster.com/support E-Mail techsupport@fluidmaster.com and Toll Free 800-631-2011.
We had a standard toilet at will work
I installed this 4 days ago. It was great for the first day. However, the Flapper doesn't seem to close a lot of the time, leaving the toilet running constantly. In a traditional toilet system, I could tweak the length of the chain to try to address this issue; but with this product that does not seem to be an option. Is there anything that can be done to address this?
Sorry can't answer this one out right. Do know answer is in installation directions. Remember twisting the body to adjust float levels. Sorry
I had a similar problem and it was caused by the water level in the toilet tank being too low on both the high and low flush. At first, I followed the Fluidmaster duoflush adjustment procedure, but my attempts to adjust the device for dual-flush operation made the flushing either incomplete or unreliable. I eventually came up with a five-step adjustment procedure that resulted in reliable flushing. The five steps are: 1) While pushing down on the blue knob located on top of the large cylinder, turn the knob to MAX. 2) Push down on the Green knob and turn it to MIN. 3) Flush the toilet by pushing DOWN on the handle and let the tank fill until the water shuts off completely. When the water shuts off, make sure the water level comes half way up the large cylinder that fits over the toilet's drain hole. 4) If the water does not come half way up the large cylinder in the middle of the tank, then use a Phillips head screwdriver to adjust the long screw on the side of the float. The float is the smaller cylinder next to the large cylinder. The float adjustment is NOT on the large cylinder with the blue and green knobs. 5) Repeat steps three and four until the water comes half way up the large cylinder. Be aware that you can be fooled by an optical illusion when looking down into water. You can correct for this distortion by measuring the water level from the bottom of the tank. Make a mark on the large cylinder with the tank full and then look for the mark after the tank empties. When you get the water level adjustment correct, let the tank sit for several hours and recheck the water level to make sure the tank is not leaking around the drain seal. When done properly, this adjustment will raise the water level in the tank high enough to produce a strong dependable flush every time you push DOWN on the handle. The final test is to flush several times over a period of 24 hours to make sure the toilet flushes properly and consistently. If it doesn't, then turn the float screw more to raise the water lever in the tank higher. This adjustment procedure will work, unless you made a mistake while installing the device, or if there is a leak in the putty seal around the duoflush adapter that fits over the toilet tank's drain hole. I gave up on the low-flush feature, which is activated by pulling UP on the handle. I could never get the low-flush feature to produce a complete flush. My adjustment defeats the reason for buying a dual-flush device, but it makes the duoflush device flush reliably every time. The Fluidmaster company provides detailed instructions on how to adjust the duoflush device so it will produce a reliable half flush, or full flush. The problem is, I was not able to get a reliable half flush by following the manufacturer's instructions, so I gave up on the low-flush feature and adjusted the device so I'd get a dependable full flush when the handle is pushed DOWN. There is no low-flush feature with my adjustment, but it's more important to me to get a complete flush every time. If the dual-flush feature is important to you, then ignore this advice and figure out how to make the adjustments work by following the the Flowmaster duoflush instructions. If you can get a reliable high and low flush by following the Fluidmaster instructions, then please tell the rest of us how you did it.
@FluidmasterSupport Thanks for trying to help. The cable geared box did click; I just took it apart and reclicked it. We'll see if that does anything. I do not know what the tank lever is; and that is not a part listed in the instruction manual. Do you mean the handle? If so; I have very little control over its placement without drilling new holes in the tank.
Rather than sent to answer your question, I strongly recommend you try calling their technical support line. I found them to be knowledge & helpful.
Fluidmaster would like the opportunity to learn more about your installation and provide help. Here is a quick tip. The handle may not be inserted all the way into the cabled gear box. Try resetting the tank lever so A) it is as close to the front wall of the tank as possible and B) reinsert handle thread into cabled gear box which should click, the click signifies it is completely inserted. If you need help please contact Fluidmaster’s Technical Service Department, we are available Monday through Friday from 5:30 AM through 5:00 PM Pacific Standard Time. Contact options include: Chat www.fluidmaster.com/support E-Mail techsupport@fluidmaster.com and Toll Free 800-631-2011.
I need a new slant seal, don't know where to get one can you show me what the seal looks like please
No
Fluidmaster sent me a complete replacement unit so I did not use the new bottom seal. I can send it to you or you can contact Fluidmaster and they will help you. fluidmaster_support@mailmw.custhelp.com
Contact Fluidmaster’s Technical Service Department for help with your product we are available Monday through Friday from 5:30 AM through 5:00 PM Pacific Standard Time. Contact options include: Chat www.fluidmaster.com/support E-Mail techsupport@fluidmaster.com and Toll Free 800-631-2011.
This model comes with a slant seal. I didn't need one, but was pleased to see it included.
I don't know if this answers your question; I replaced the old flush valve with this one a couple of years ago. I'll attach a picture of the old one. The 'flapper valve' (red part in the picture) is designed with a swing pivot. The new one had features to accommodate that design. Perhaps the manufacturers web page has more detailed information...link is. https://www.fluidmaster.com/products/toilet/flush-valves/550dfrk-dual-flush-conversion-system/
Can I remove my fluid master duo flush and go back to my regular toilet set up?
Yes
Yes, you can remove it and go back to your original setup. You should be able to keep the fill valve because it works just like any other.
Yes. You have have to replace the bowl to tank gasket if the clips dig in
Yes. It will require purchase of entirely new flushing mechanisms as well as new gaskets.
You could, but I don't know why you would. The system works so well and hardly ever clogs.
I replaced an earlier generation of the Fluidmaster duo flush and what you cannot tell from the pictures is you have to have an overflow tube, and the earlier generation did not have an overflow tube. I am having trouble getting to bowl to fill adequately but I cannot figure how to adjust. There is a comment in the troubleshooting that the water level must be higher than the oval opening and I have no idea what that is referring to
The old version has the tube on the side. The newly designed unit has no tube. and the cable enters at the top. The fill valve is a separate unit and you use it to adjust water level in the tank. The dual flush adjustments regulate how much water is used to flush the toilet.
Thank you for your question concerning Duo Flush System Toilet Converter @ The Home Depot. The Duo Flush Canister has two oval windows on the side of the system that allows you to see inside the canister and see the floats that the dials are operating. These are the windows that are being referred to. Hopefully by raising the water level to the top of these windows it will give you the flush volume you need for a proper flush. For additional questions on this Fluidmaster product contact us at your earliest convenience. Fluidmaster’s Technical Service Department is available Monday through Friday from 5:30 AM through 5:00 PM Pacific Standard Time. Contact options include: Chat www.fluidmaster.com/support E-Mail techsupport@fluidmaster.com and Toll Free 800-631-2011.
You should have an overflow tube in your tank already. This product does not remove that. The product uses the small black tube shown in the upper left of the picture to fill the bowl. You adjust the amount of water required to fill your bowl with the pinch unit on the tube.
I adjusted the water level by turning the adjustment screw on the side of the overflow tube. Looks like a black Phillips screw
Yes, you need an overflow tube. I would verify this by calling Fluidmaster. They have a very good support team and I would not be surprised if they send you one at no cost.
Viewing 1-8 of 35
Customer Reviews
2.8 out of 5
5
179
4
116
3
52
2
68
1
272